Tuesday, February 26, 2019
How to format a laptop
How to format a laptop

How to Format Laptop Windows 7/8/10 (2019 Update)
When some stubborn viruses enter your computer, if you can’t eliminate these Trojan viruses, you can format the computer. Or you can do it when there is too much stuff on computer. But how to format the computer? Here’s a look at the simplest methods to format a laptop windows 7/8/10.

There are two types of formatting. The first is the system drive (defaults to disk C) formatting. Generally after entering the operating system, you are unable to format system disk directly, and you can only achieve it in the process of installing an operating system. The second is for non system disk (defaults to D dish, E, etc.) formatting. After turning on computer, just right-click on the disk and select format. Note the contents of the disk are gone and cannot be recovered rapidly. So make sure you create a backup before starting to format your HP or Dell laptop.
Solution 1. Format Laptop Windows 10 with Reset this PC
The methods for formatting Windows computers are various, but when it comes to Windows 10, the process is quite decent. The whole procedure of formatting Windows 10 is undergoing with friendly interface and step-by-step guide.
- Step 1. Click Start menu on bottom left corner, then click the gear icon to open Settings.
- Step 2. On Settings home page, select Update & Security, then click Recovery tab from the left panel.

- Step 3. Check available options:
- Reset this PC: This is exactly the option that we need, but you should also check other ones which may be able to fix some issues on Windows 10.
- Advanced startup: There will have a lot of sub-options, such as start up from a bootable USB drive, change Windows startup settings, or restore from a system image.
- More recovery options: Start fresh with a clean installation of Windows.
- Back up your files: Backup your files to another drive.
- Step 4. Click Get started button under Reset this PC, then you will see two options:
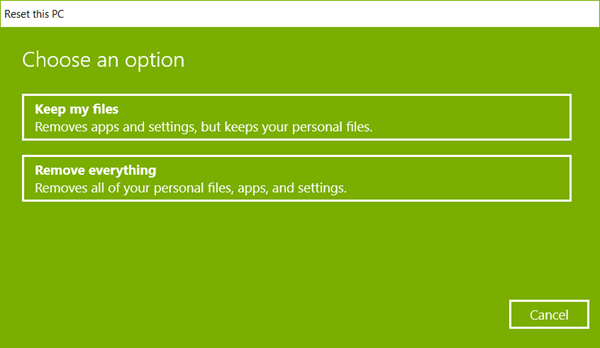
- Keep my files: remove apps and settings, but keep your personal files.
- Remove everything: remove all of your personal files, apps and settings.
- Step 5. Complete erasing of data.
While proceeding towards the formatting process of the computer, you will receive two options: Just remove my files and Remove files and clean my drive after clicking on “Remove everything” option.- Just remove my files allows the user to recover the media and files from the drive of the computer. If the user is selling his computer or giving it to anyone else for use, then the data is in danger as the third person can easily recover all the files and data from the drive. This makes this option less secure and risky.
- Remove files and clean my drive is time-consuming but completely safe. It erases all the data from the system thoroughly including the drive. However, the system takes some time to remove all the data from the drive.
- Step 6. Click Next when the operating system asks for confirmation, then choose Reset button.
The Windows 10 computer will start the reset process by restarting the computer automatically. You need to wait until the reset process gets finished which may vary from a few minutes to hours, then your PC will get started with fresh Windows 10.
Solution 2. Format Laptop Windows 7 with System Repair Disc
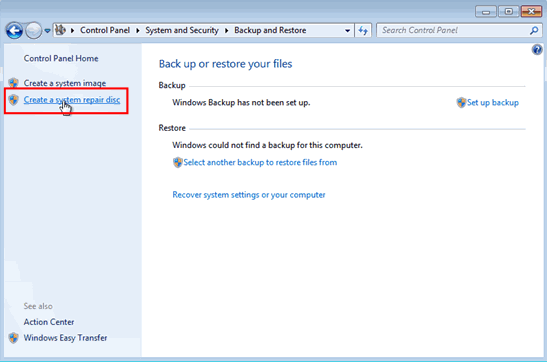
- Step 1. Start your laptop and click Control Panel > Backup and Restore > Create a system repair disc.
- Step 2. Insert a CD into your laptop and click “Create disc”. Then select “Close” and “OK”.
- Step 3. Type F10 or F12 to enter the boot menu and select the CD as boot device. Click “Enter” and “Next”, then select your windows system in “Use recovery tools that can help fix problems starting Windows”.
- Step 4. Click “Next” and “Command Prompt”. Enter “Format c:/fs:NTFS” and start to format your system disk.
Solution 3. Format Laptop with Windows Installation USB/CD (Windows 7/8/10)
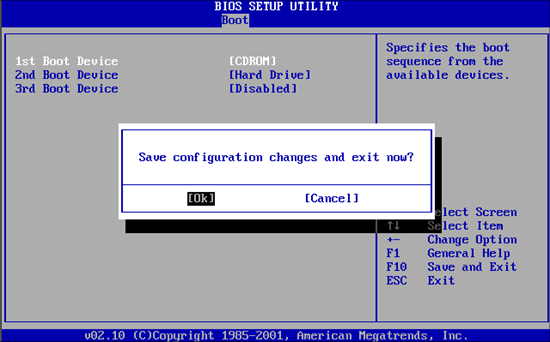
- Step 1. Press “Delete” to enter the BIOS when starting your laptop. Select “Advanced BIOS Features” and set the First Boot Device to CDROM. Click Y to save and exit setup.
- Step 2. Insert the Windows installation USB or CD into your laptop, and then enter “DOS”.
- Step 3. Type “format C:/” in the DOS prompt and enter Y to complete formatting.
- Step 4. After formatting, insert your own Windows 7/8/10 system disk (CD boot) and follow the instructions to install.
Solution 4. Format Laptop Without Windows Installation USB/CD
- Step 1. Start your computer, then press F8 or F11 before Windows loads.
- Step 2. Click “Next” to enter System Recovery. There are two options for choose. If you have already backed data up, a Destructive Recovery will help you get a brand-new laptop.
- Step 3. The utility will complete the formatting and restart your laptop. Just wait patiently until the last.
Tip: If you haven’t saved anything of the laptop disk before formatting, there is still great chance to recover lost files/photos/videos from laptop using professional data recovery software like RePicvid Free Photo Recovery.
Monday, February 25, 2019
How to insulate a garage
How to insulate a garage

How to Insulate Your Garage (And Why Every Homeowner Should)

No matter what the weather is like outside, the temperature of your garage will typically follow the same temperature pattern. For the average homeowner, the garage is an area where temperature control can be a bit of a challenge.
The garage is well-known to be plagued by constant temperature fluctuations. Not only do these fluctuations have the potential to damage all the items you store in side, but it can wreak havok on your energy bills. Depending on the layout of your home, a poorly-insulated garage can ever have an affect on the temperature inside your home, especially within any rooms with a connecting wall to the garage.
So, what’s a homeowner to do? An easy solution is to add insulation to the garage door. Here’s why every homeowner should invest in this (relatively) cheap project.
Why You Should Insulate Your Garage
The most notable benefit of adding insulation in your garage is the ability to have better comfortable over the temperature. However, there are many other benefits you can expect from this easy DIY improvement.
One important benefit is the amount of energy you can potentially save. This can equate to a dramatic slash in your bills long after the insulation has been installed.
Another lesser-known benefit is that it can help create a sound-proof environment, keeping sounds out or in, depending on your situation. For example, if you live on a busy street, garage insulation can help quiet the loud noise of traffic. Or, perhaps, you are using your garage as a workshop or to learn to play the drums, insulation will help prevent that noise pollution from becoming an annoyance to your neighbors.
Areas You Can Add Insulation
Within your garage, you have three main areas in which you can add insulation. While it would be ideal to sure all three areas are properly insulated, it’s not always going to be feasible, as least not for the average homeowner.
1) Garage Door:
The easiest and cheapest area is to add insulation on your garage door. You can buy different types of insulation or buy a garage door insulation kit that has everything you need. Either way you go, this DIY project should only take a few hours to complete, and will save you thousands of dollars over the course of its lifetime.
As the main barrier to the exterior, adding insulation on your garage door is strongly recommended for every homeowner. This is especially true for anyone that has an interior wall connected to the garage.
2) Garage Walls:
Adding insulation to your garage walls is going to be a little more complex of a project. Likely, this is one area you shouldn’t need to be concerned about as homes, by law, are built with insulation in the walls. This is primarily due to the fire hazards associated with garages. Specifically, the type of combustible materials stored in the area, as well as the fact that most garages do not have a smoke detector.
Regardless, insulating the walls in your garage is something you should consider, especially when your home has an interior wall connected to it.
3) The Ceiling
The often forgotten about area in your garage, the ceiling is an incredibly important area to have insulation. If you have a bedroom directly above the garage, that room will experience the wrath of the weather outside if your garage does not have proper insulation.
Of course, adding insulation inside a ceiling is a very complex project that your average homeowner will be hesitant to embark on. You would need to consider the air flow and whether condensation may build up, which could lead to mold. This is definitely a job for a professional.
While installing insulation in the ceiling of your garage will certainly slash your energy bills and add comfort to the room above, it’s going to be significantly more expensive and time-consuming to complete and you may never fully see a return on your investment.
Types of Garage Door Insulation
Before you attempt this project, you should have a pretty good understanding of the different types of garage insulation available to you. While each of them will help you regulate the temperature and create a favorable environment within your garage, they do come with their own set of pros and cons.
1) Foam Boards:
Relatively cheap and easy to work with, foam boards are a stiff, firm insulation option that is a great choice for your garage door. Usually made from polystyrene, foam board insulation is easy to install, extremely lightweight and durable enough to handle extreme environments.
Available in large panels, foam board insulation is the easiest material for your average homeowner to work with. All you need is a measuring tape, box cutter, and an adhesive to adhere the board to the garage door. Out of all garage insulation options, this is the one that most homeowners will be interested in.
- Ideal For: Installing on garage doors.
2) Batt Insulation:
Another cheap option that is easy to work with, batt insulation is going to be a great choice to install inside the walls and directly between studs. This type of insulation is typically made from fiberglass and available in precut sizes. It’s not the best choice for insulating your garage door, but can still be strategically used in this area.
- Ideal For: Behind drywall, inside walls and ceilings.
3) Loose & Blown-In Insulation:
Often used within attics or between walls, this type of insulation is loose and, as the name suggests, blown into place. You can find this available in a variety of materials and is relatively cheap to buy and install. Because of the nature of how it is applied, you can fill the small crawlspaces, corners and crevices within your attic.
However, for your garage, this type of insulation may prove somewhat difficult to use.
- Ideal For: Attics, crawlspaces and wall cavities.
4) Insulating Foam Sealant:
Another insulation option is spray foam, also called insulating foam sealant. This type of insulation is available in different forms. You can buy large quantities that work great for attics, or a small can of spray foam that work great at sealing the flow of air around windows or doors. For the purpose of insulating your garage door, we will only discuss insulating foam sealants available in small cans.
While a can of foam sealant is relatively cheap, these aren’t going to be the cheapest option for insulating a garage. These are best used to seal the flow of air around the edges of your garage door, or any other area that is hard to reach.
- Ideal For: Small cracks, crevices and hard-to-reach areas.
Are Garage Door Insulation Kits Worth It?
This largely depends on your situation, the size of your garage door and how much time you’re willing to put into completing the project. For most homeowners, a garage door insulation kit is going to be the easiest option.
Featuring fiberglass or polystyrene panels, these kits will generally come with enough pre-cut panels to cover a garage door with a width of 9 ft. Equipped with pretty much everything you need, you can buy a garage insulation kit at a variety of retailers, including Home Depot, Lowes or Amazon. The cost of an insulation kit will range from about $70 to $100.
The Downside of Pre-Packaged Insulation Kits
The downside of buying a pre-made insulation kit is that they are all designed for the same size garage door in mind. This may leave you too much, or not enough, insulation to complete the project.
While this is an easy problem to resolve, nobody wants to pay for something that they don’t need. Or, be forced to make a second trip to the hardware store because you discovered at the tail-end of the insulation process that you don’t have enough materials to complete the job.
Do-It-Yourself Garage Door Insulation
While a garage door insulation kit is certainly a convenient option, you can often get better results by simply building our own kit. This is an easy DIY project that shouldn’t take more than a day.
It entails separately buying all the materials you’d find in a garage insulation kit, and then replicating your own insulation and putting in a little bit of work on your own. Customizing the insulation to fit your garage door ensures that you get maximum coverage, leading to increased savings and comfort.
How to Install Insulation on Your Garage Door
Below are some general tips you can follow to help you install insulation on your garage door.
Materials You Will Need:
- Foam insulation panels
- Box cutter or razor blade
- Adhesive or glue
Installation Instructions:
- Measure Door & Calculate Material Needs — First, measure your garage door and calculate how much insulation you will need. Measure the dimensions of each panel on your garage door. Typically, these panels will be the same size, making it easy to calculate how much insulation you will need.
- Buy Materials — Next, head over to Lowes, Home Depot or your preferred hardware store and purchase the required insulation. While you’re there, you will also want to pick up some adhesive to glue the foam insulation to the garage door. Also, a box cutter, if you don’t already have one.
- Cut Foam Insulation to Size — Now that you know the dimensions for each panel on your garage door, cut the foam insulation to size. Repeat this step until you have cut enough insulation to cover the entire door.
- Adhere Insulation to Garage Door — Open your adhesive and start adhering your cut insulation to the door. If needed, you can use a little bit of masking or duct tape to help you hold each foam panel in place as the glue dries.
- Let Dry — Allow plenty of time to completely dry. The amount of time may differ depending on the type of adhesive you use. Generally, a few hours will be sufficient, but it may be wise to wait a full day to allow the adhesive to bond.
- *Optional: Apply Foam Sealant &mash; To really put the final touches on this project, you can use a can of foam sealant to help fill in any small gaps. This could include between the foam panels on the garage door, or even the small openings along the wall just inside the garage.
Please Note: The DIY option may cost a bit more in materials and time, but it’s well worth it in the long run.
Other Questions?
Thinking about adding insulation in your garage, but still have questions we didn’t address here? Or, perhaps, you’ve already completed this project and would like to add a few tips to help others?
Let’s hear it! Please contribute to the conversation by adding your questions, tips or concerns down in the comments below.
Saturday, February 23, 2019
How to add idm extension in chrome
How to add idm extension in chrome

Chrome Browser Integration
I do not see IDM extension in Chrome extensions list. How can I install it?
How to configure IDM extension for Chrome?
Please note that all IDM extensions that can be found in Google Store are fake and should not be used. You need to install IDM extension manually from IDM installation folder. Read in step 2 how to do it.
1. Please update IDM to the latest version by using "IDM Help->Check for updates..." menu item
2. I don't see "IDM Integration module" extension in the list of extensions in Chrome. How can I install it?
Our extension is hidden on Google Store, and it cannot be searched as well. This is made by design, because there is no sense to install extension without IDM, also the extension should be installed automatically during IDM installation.
If extension is not installed, then in order to install it manually you need to press on Chrome menu (arrow 1 on the image below), select "More tools" menu item (arrow 2) and then select "Extensions" tab (arrow 3). After this open IDM installation folder ("C:\Program Files (x86)\Internet Download Manager" by default, arrow 4 on the second image) and drag and drop "IDMGCExt.crx" (arrow 5 on the image) file into "Extensions" page opened in your Chrome ("Drop to install" popup will appear while dragging over the "Extensions" page). Please note that file may be named simply IDMGCExt if your Windows Explorer does not show file extensions.

If Chrome shows warning that you "attempted to downgrade extension", please check again that you updated IDM to the latest version.
If Chrome shows above warning message near its menu bar, you need to install install IDM Integration Module extension from Chrome Web Store
3. How to configure IDM extension for Chrome?
If you already added IDM extension into Chrome you need to configure it correctly. First press "Details" option for IDM extension.

Then check that "IDM Integration Module" extension is enabled (arrow 1 on the image). If you use incognito mode in Chrome, you need to enable "Allow in incognito" checkbox (arrow 2 on the image).

Thursday, February 21, 2019
How to insert pdf into word
How to insert pdf into word

How to Insert a PDF into a Word Document for Free
Word Documents are a great file format for presenting a wide variety of different document types. There may be some instances where you want to insert a PDF into your Word document. It is not difficult to insert a PDF into word, but may be a bit time consuming if you don't have the right tool. Let's take a look at how to insert a PDF into a word document.
Insert PDF into Word for Free
Within your word document, you can insert a PDF file as an object. While you might be able to open it, view it, and resize it, you can't edit it. Here's how to embed PDF in word.
Step 1. Insert PDF to Word
While working on your document, click "Insert" > "Object". In the object dialogue box, click "Create from File" and then click "Browse" to find the PDF document you want to insert. Click "Insert".
Step 2. After Embedding PDF into Word
If you want to display the PDF icon, check "Display as icon". Leave this option unchecked if you want to display the first page of the document. Then click "OK" to finish.

Insert Multi-Page PDF into Word File
PDFelement can help you insert a multi-page PDF document into a word file easily, and you can view the content in the word document directly. Here are the steps to follow.
Step 1. Convert a Multi-Page PDF
After opening PDFelement, you can drag and drop your multiple page PDF into the program to open it, then right-click the page in the Thumbnail to choose "Adjoin all pages into one single image".

Step 2. Insert into Word
After conversion is complete, you will have an image file with multiple pages. You can then open your target word document and click "Insert" > "Picture" to select this multi-page file to insert.

Edit or Read PDF before/after Inserting PDF into Word
Follow the above steps to add PDF to word as an object. If you want to edit it after you insert it, you'll need to have a PDF editor installed to read or edit PDF files before or after adding your PDF to word. This is why it is important to use PDFelement, which enables you to read, annotate and edit PDF documents.
* It comes with many tools that make it easy for you to combine, edit, transform and organize your PDF files with ease.
* It is very useful in converting PDF files to other formats such as Word, Excel, PowerPoint and more.
* It can also be used to insert new pages into a PDF or existing pages from other PDFs, as well as combine multiple file formats like Word or Excel and PDF.
Despite all of its impressive features, PDFelement is very easy to use, even for a beginner.
* It also comes with the Optical Character Recognition (OCR) feature that enables scanned PDFs or image-based PDFs to be transformed into editable and searchable text. It is essential to perform OCR on any PDF document before converting it to editable formats such as Word, Excel or PowerPoint.
* Best of all, your document's formatting will not be altered in any way.
Edit PDFs Like a Word Document
* Before or after inserting PDF into word, you may need to read or even modify the content of the PDF document. PDFelement helps you do this easily. It not only provides various reading modes for you to choose from, but also allows you to edit a PDF like you would a word file.

Attach Word to PDF
PDF format is also one of the best formats when it comes to layout and presentation of your document. If you want to display both Word and PDF documents together, you also have the option of attaching the word file to a PDF file instead using the attachment feature of PDFelement. Click here to know how to add an attachment to a PDF. Now you can easily attach PDF to Word, or vice versa!

Tuesday, February 19, 2019
How to prepare jollof rice
How to prepare jollof rice

How to cook Nigerian Jollof Rice
The Nigerian rice recipe discussed here is the classic Nigerian Jollof Rice prepared at parties. This is the most popular Nigerian rice recipe. This is why you will always see it in parties. It is quite easy to prepare if you follow the simple steps.
Ingredients
- 3¾ cups (750g) long grain parboiled rice
- 2-3 cups Tomato Stew
- Chicken (whole chicken, drumsticks or chicken breast)
- Pepper and salt (to taste)
- 2 medium onions
- 3 Knorr cubes
- 2 teaspoons thyme
- 2 teaspoons curry powder (Nigerian curry powder)
Before you cook Jollof Rice
- Prepare the tomato stew. Visit the Tomato Stew page for details on how to do that. It is advisable to prepare tomato stew before hand and keep in the freezer. This is so that whenever you want to cook any jollof rice related dish, it is just a matter of adding it to your cooking.
- If you will use whole chicken then wash and cut it into pieces. Cook with the thyme, Knorr cubes and 2 bulbs of onions (chopped). The cooking time depends on the type of chicken. The rooster or cockerel cooks much faster than the hen but the hen is definitely tastier. When done, grill it in an oven. You may also fry it. This is to give it a golden look which is more presentable especially if you have guests for dinner.
- Parboil the rice using the method detailed in parboiling rice for cooking jollof rice. Rinse the parboiled rice and put in a sieve to drain.
Cooking Directions
- Pour the chicken stock and the tomato stew into a sizeable pot and leave to boil.
- Add the drained parboiled rice, curry powder, salt and pepper to taste. The water level should be the same level of the rice. This is to ensure that all the water dries up by the time the rice is cooked.
- Cover the pot and leave to cook on low to medium heat. This way the rice does not burn before the water dries up.
If you parboiled the rice as described at parboiling rice for cooking jollof rice, the rice should be done by the time the water is dry. Taste to confirm. If not, you will need to add more water and reduce the heat to prevent burning. Keep cooking till done.
Serve with Peppered Fish, Fried Plantains, Nigerian Moi Moi, Nigerian Salad or Coleslaw.
You can spice up this recipe by adding 2 well known vegetables to arrive at what we refer to as Mixed Vegetables Jollof Rice.
How to take screenshot in laptop
How to take screenshot in laptop

How to Take Screenshots in Windows 10

A screenshot is an image taken of whatever’s on your screen. Today we’re going to show you how to take a screenshot in Windows.
You can take a screenshot on just about any platform, and taking screenshots in Windows is no different. It has a built-in option that works great for basic tasks, but many third-party programs offer more ease of use and features. In this article I’ll show you a few different ways to take a screenshot in Windows 10.
Method One: Take Quick Screenshots with Print Screen (PrtScn)
- Press the PrtScn button to copy the screen to the clipboard
- Press the Windows+PrtScn buttons on your keyboard to save the screen to a file
- Use the built-in Snipping Tool
- Use the Game Bar in Windows 10
The Print Screen button on your keyboard can take a screenshot and save it as a file, take a screenshot without saving it as a file, or take a screenshot of only one window (instead of the whole screen). The print screen button may be labeled as “PrtScn,” “PrntScrn,” “Print Scr,” or something similar. On most keyboards, the button is usually found between F12 and Scroll Lock. On laptop keyboards, you may have to press the “Function” or “Fn” key to access the Print Screen feature. When you press the key, it will look like nothing happened, but the screenshot has been saved to your clipboard.
To Save Your Screenshot as a File
Press the “Windows logo key + PrtScn.” If you’re using a tablet, press the “Windows logo button + volume down button.” On some laptops and other devices, you may need to press the “Windows logo key + Ctrl + PrtScn” or “Windows logo key + Fn + PrtScn” keys instead. Check your laptop’s manual for more information.
The screen will dim for a moment, and you will see the screenshot appear as a file in a folder entitled “Screenshots”, inside your default “Pictures” folder. The screenshot is automatically labeled with a number.

You will only see your screen dim if you have the “Animate windows when minimizing and maximizing” turned on in your visual effects settings (System > Advanced system settings > Click the Advanced tab > Click Settings under Performance section).

To Take a Screenshot Without Saving
Press the “PrtScn” key. A screenshot of your display is now copied to the clipboard. Open your favorite image editor, word processor, or other program you want to use the image in. Choose Edit > Paste to paste the screenshot wherever you like. The dimensions of the image will be the same as your desktop resolution. Note: On some laptops and other devices, you may need to press the “Alt + Fn + PrtScn” keys instead. Check your laptop’s manual for more information.
To Take a Screenshot of Only One Window
Click on the title bar of the window that you want to capture. Press “Alt + PrtScn”. A screenshot of your currently active window will be copied to the clipboard, just as in the last section. Paste it into your favorite image editor or document editor. Note: On some laptops and other devices, you may need to press the “Alt + Fn + PrtScn” keys instead. Check your laptop’s manual for more information.
To Take a Screenshot of Part of Your Screen
Press “Windows + Shift + S”. Your screen will appear grayed out and your mouse cursor will change. Click and drag on your screen to select the part of your screen you want to capture. A screenshot of the screen region you selected will be copied to your clipboard. You can paste it in any application by selecting Edit > Paste or pressing Ctrl + V, just as you’d paste a full-screen shortcut taken with the Print Screen key.
This only works in Windows 10’s Creators Update. On older versions of Windows, this shortcut is part of Microsoft’s OneNote application. With the Creators Update, Microsoft integrated this shortcut into Windows 10 itself.

Method Two: Take More Flexible Screenshots with Snipping Tool
The Snipping tool has been a part of the Windows for long time. This tool was first included in Windows Vista, and never got any new features apart from few bug fixes. Snipping tool can take screenshots of an open window, rectangular area, a free-form area, or the entire screen. You can annotate your snips with different colored pens or a highlighter, save it as an image or MHTML file, or email it to a friend.
Snipping Tool in Windows Vista, 7, and 8 has one limitation: it can’t capture screenshots that involve mouse movements. To capture something that involves mouse movement, like pop-up menus and tooltips, you will have to use the Print Screen method.
In Windows 10, Snipping Tool has a new “Delay” option, which will allow you to capture screenshots pop-up menus and tooltips. Open the Snipping Tool app and click Delay. From the drop-down list, click on the number of seconds you’d like to wait until your screenshot is taken.

Now choose the type of snip you want to make by clicking the arrow next to “New.” You can choose from one of four types of snip: free-form, rectangular, window, and full-screen.

Unlike a regular snip, the screen will not immediately fade out. Instead, you will have between 1–5 seconds, depending on the delay you chose, to set up your screenshots. You can use this time to open that pop-up menu or tooltip you want to capture. Once your seconds have passed, the screen will freeze and fade out so you can create your snip. If you chose window or full-screen, it will just capture the snip immediately.
Method Three: Use Keyboard Shortcuts with Game Bar in Windows 10
Windows 10 ships with game DVR capabilities to record gameplay footage and take screenshots of Windows PC games. The Game Bar generates screenshots in PNG format, and saves them in “C:\Users\[your username]\Videos\Captures.” Before you start using the Game Bar, launch the Xbox app that came with Windows 10 open its settings. Under “Game DVR”, toggle “Take screenshots using Game DVR,” and assign whatever keyboard shortcuts you want.

When you want to take a screenshot, use that keyboard combination (“Windows key + G” by default) and click or tap on the “Yes, this is a game” box if prompted. Now press the “Camera icon” or “Win + Alt + PrtScn” to take a screenshot. Note: The keyboard shortcut will only work if you have previously checked the “Yes, this is a game” box for this specific game. You will see a notification letting you know “Screenshot saved.” If you click or tap on the notification, it will open to “Xbox > Game DVR > On this PC” to see it.

Method Four: Take More Powerful Screenshots the Easy Way with Snagit

All of Windows’ built-in methods have their their own pros and cons. If you take a lot of screenshots and want more flexibility than the built-in tools offer, though, a third-party tool is your best option.
If you don’t mind spending a few dollars, Snagit by Techsmith is a top-notch tool that makes taking screenshots easy, has tons of features that let you target specific windows, take region snapshots, and even capture the full text of scrolling windows like web pages.
You can take short videos if you want, annotate screenshots, draw arrows and shapes, and pretty much anything you can imagine a screenshot tool should be able to do. It’s a great tool that we definitely recommend, especially if you need to take a lot of screenshots.
There’s a free trial that you can download to check it out before bothering to spend money on it. Once you try it, it’ll be hard to go back to Windows’ barebones tools.

Saturday, February 16, 2019
How to load airtel card
How to load airtel card

How To Load Recharge Cards on MTN, GLO, Airtel, Etisalat and Visafone Prepaid Lines
The following will teach you how to load recharge cards for prepaid lines. In order to top up your airtime balance, you need to use some codes with the pins usually sealed papers.
Airtel Nigeria
Airtel Nigeria recharge card pins has a 16-digit number. To recharge use the recharge PIN in the following USSD format: *126*PIN# and then Send/Ok. Example, if the PIN is 2222 3333 4444 5555, input *126*2222333344445555# and press Send/Ok. Dial *123# to check account balance.
Airtel Nigeria recharge card pins has a 16-digit number. To recharge use the recharge PIN in the following USSD format: *126*PIN# and then Send/Ok. Example, if the PIN is 2222 3333 4444 5555, input *126*2222333344445555# and press Send/Ok. Dial *123# to check account balance.
MTN Nigeria
To recharge an MTN Nigeria line use the recharge PIN in the following USSD format: *555*PIN# and then Send/Ok. MTN Nigeria recharge card PIN has 12 digits. Example, if the PIN is 2222 3333 4444, input *555*222233334444# and press Send/Ok. Text 8 to 131 or dial *556# to check account balance.
To recharge an MTN Nigeria line use the recharge PIN in the following USSD format: *555*PIN# and then Send/Ok. MTN Nigeria recharge card PIN has 12 digits. Example, if the PIN is 2222 3333 4444, input *555*222233334444# and press Send/Ok. Text 8 to 131 or dial *556# to check account balance.
Etisalat Nigeria
To recharge an Etisalat line use the recharge PIN in the following USSD format: *222*PIN# and then Send/Ok. Etisalat Nigeria recharge pins has a 15-digit PIN. Example, if the PIN is 222 333 444 555 666, input *222*222333444555666# and press Send/Ok. Dial *232# to check account balance.
Recharging a friend and loved one line from your own phone, just dial *222*PIN*Receiver’sNumber#. The receiver will be credited as well as notified of the transaction.
Glo Nigeria
To recharge a Glo line use the recharge PIN in the following USSD format: *123*PIN# and then Send/Ok. Glo Nigeria recharge codes has a 15-digit PIN. Example, if the PIN is 2222 3333 4444 555, input *123*222233334444555# and press Send/Ok. Dial #124# to check account balance.
To recharge a Glo line use the recharge PIN in the following USSD format: *123*PIN# and then Send/Ok. Glo Nigeria recharge codes has a 15-digit PIN. Example, if the PIN is 2222 3333 4444 555, input *123*222233334444555# and press Send/Ok. Dial #124# to check account balance.
Visafone
For Visafone recharge, scratch the silver panel area on your recharge card to reveal 14 digit PIN number. Then, type the following on your phone: *889* followed by 14 digit recharge number. Press YES/OK/SEND to recharge (889* PIN SEND) OR Dial *888* Listen and follow the voice prompt, press 1 and enter 14 digit PIN, then the # key. Your credit will be loaded automatically with the recharge card value and you will receive a text confirmation of the recharge. To check credit balance, simply Dial *775# Send OR Dial *888* listen to the voice instruction and press 2.
For Visafone recharge, scratch the silver panel area on your recharge card to reveal 14 digit PIN number. Then, type the following on your phone: *889* followed by 14 digit recharge number. Press YES/OK/SEND to recharge (889* PIN SEND) OR Dial *888* Listen and follow the voice prompt, press 1 and enter 14 digit PIN, then the # key. Your credit will be loaded automatically with the recharge card value and you will receive a text confirmation of the recharge. To check credit balance, simply Dial *775# Send OR Dial *888* listen to the voice instruction and press 2.
Friday, February 15, 2019
How to read a smart meter
How to read a smart meter

How to read your smart meter
We understand that reading smart meters isn't as simple as it should be so we've got some instructions below that should help you out.
Once you know how to read your meter, making sure you do so regularly keeps you on top of your energy. You can set up email reminders online.
Electricity smart meters
To find your electricity read you're looking for a number followed by "KWH" (but remembering to ignore the numbers after the decimal place).
If you have a keypad
.png)
To get a reading from these smart meters:
- Press 9 on the keypad.
- A series of letters will appear: IMP KWH.
- Then you’ll see 8 digits (e.g. 0012565.3) followed by kWh at the bottom right of the screen.
- This is your read, so in this case your reading would be 12565.
If you have an Economy 7 smart meter (your meter records day and night usage):
- Press 6 on the keypad until you see 'IMP R01' followed by 8 digits - this is usually your night/off-peak reading.
- Then keep on pressing 6 on the keypad until you see 'IMP R02' followed by 8 digits - this is usually your peak/normal reading.
- We only need the digits ahead of the decimal point.
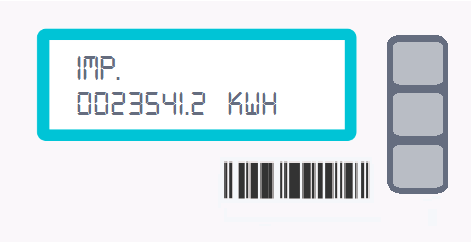
If you have two buttons
.png)
To get a reading from these smart meters:
- Press the "Display" or "Display Select" button.
- By pressing the button the meter display will scroll through to the meter reading. The number you're after is the one followed by kWh.
- As before write down all the digits except for those after the decimal place.
- In this example the meter reading is 23541.
If you have A and B buttons
.png)
To get a reading from these smart meters:
- Press the A button.
- Keep on pressing this until you get to TOTAL ACT IMPORT.
- The number shown below this is your meter reading.
- In this example the meter reading is 11256.
If you have 3 buttons
To get a reading from these smart meters:
- Press the middle button.
- The number shown below IMP is your meter reading.
- If you have a 2-rate meter, R1 indicates Rate 1, R2 is Rate 2 and T is total.
- You can press the middle button again to see all the readings.
- In this example the meter reading is 23541.
If you have an orange button on the left and blue buttons on the right
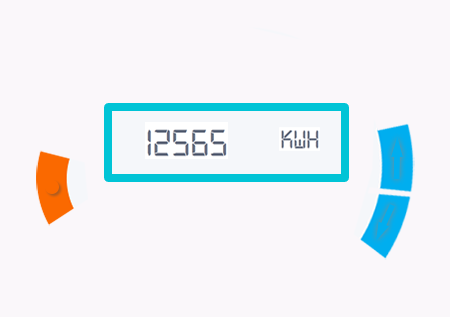
To get a reading from these smart meters:
- Press the orange button.
- You'll see a row of digits followed by kWh.
- The reading in this example is 12565.
Gas smart meters
To find your gas read you're looking for the number followed by "M3" (but remembering to ignore the numbers after the decimal place).
If you have a keypad
.png)
To get a reading from these smart meters:
- Press 9 on the keypad.
- VOLUME will appear on the screen.
- Then you’ll see a row of digits (e.g. 00063.5) followed by M3 at the bottom right of the screen.
- The read in this example is 00063.
If you have A and B buttons
.png)
To get a reading from these smart meters:
- Press the A button.
- Keep on pressing this until you get to METER INDEX.
- The number shown below this is your meter reading.
- In this example the meter reading is 63.
If you have a left arrow, a circle and a right arrow
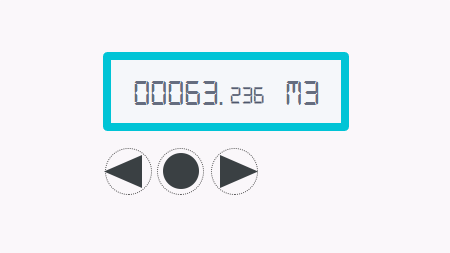
To get a reading from these smart meters:
- Press the middle 'circle' button.
- The screen will show 'current meter reading' written along the top.
- You'll see a row of digits followed by m3.
- The read in this example is 63.
If you have 3 square red buttons
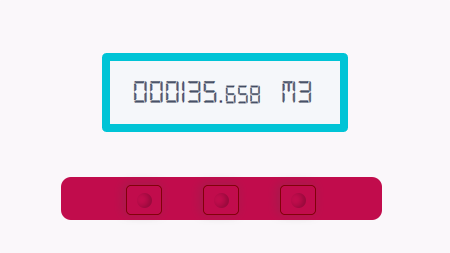
or
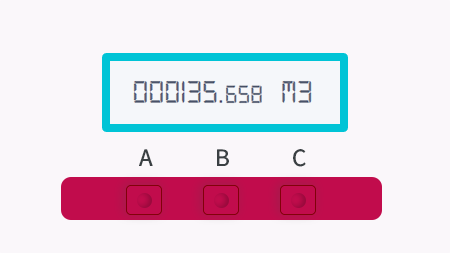
Your buttons may or may not be labelled A, B and C. To get a reading from these smart meters:
- Press the 'A' or left button.
- You'll see a row of digits followed by m3.
- The read in this example is 135.
If you have an orange and a blue arrow to the right of the screen
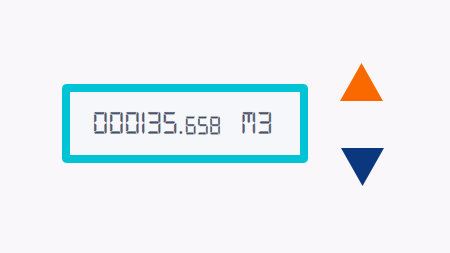
To get a reading from these smart meters:
- Press the orange button.
- You'll see a row of digits followed by m3.
- In this example the meter reading is 135.
Subscribe to:
Comments
(
Atom
)
-
ChomChom Roller Dog Hair Remover, Cat Hair Remover, Pet Hair Remover Revlon One-Step Hair Dryer & Volumizer Hot Air Brush, Black ...
-
10 Remedies And 8 Exercises To Get Rid Of A Double Chin Healifty V Face Band V Line Bandage Breathable Face Lift Belt Anti Wrinkle Ch...


How to moisturize vagina
How to moisturize vagina Vaginal Dryness: Causes and Moisturizing Treatments IN THIS ARTICLE Causes Diagnosis Medication Oth...