Showing posts with label computers & electronics. Show all posts
Friday, January 17, 2020
How to update apps on ios 13.1
How to update apps on ios 13.1

How To Update Apps In iOS 13
With every iOS release, Apple makes some slight changes to the UI of some of its apps. This is natural as over time, they might come up with new ideas on how to make it better and easier to use. However, in one of the changes in iOS 13, and we imagine it will probably be sticking around for the next few iOS updates, Apple changed up the UI of the App Store a bit.
Previously, the iOS App Store had a separate tab at the bottom row in which users could check for app updates, but now that’s gone, so how do you update your apps? If you’re asking those questions, check out the guide below on how to update your iOS apps in iOS 13 (and beyond).
How To Update Your Apps In iOS 13

- Launch the App Store
- Tap your profile photo at the top right corner of the app’s screen
- Scroll down and you will find a list of apps on your phone that have been updated or are pending updates
- To check to see if you missed any updates, pull the screen down from the top to refresh the page
- Tap Update All to update new apps that have not been automatically updated and you should be all good to go
We should mention that turning on automatic app updates will in part solve this problem, but in case you need to update an app right now, you can follow the method laid out above to update it manually. However, if you have not turned on automatic app updates, here’s how to do it.
How To Turn On Automatic App Updates In iOS
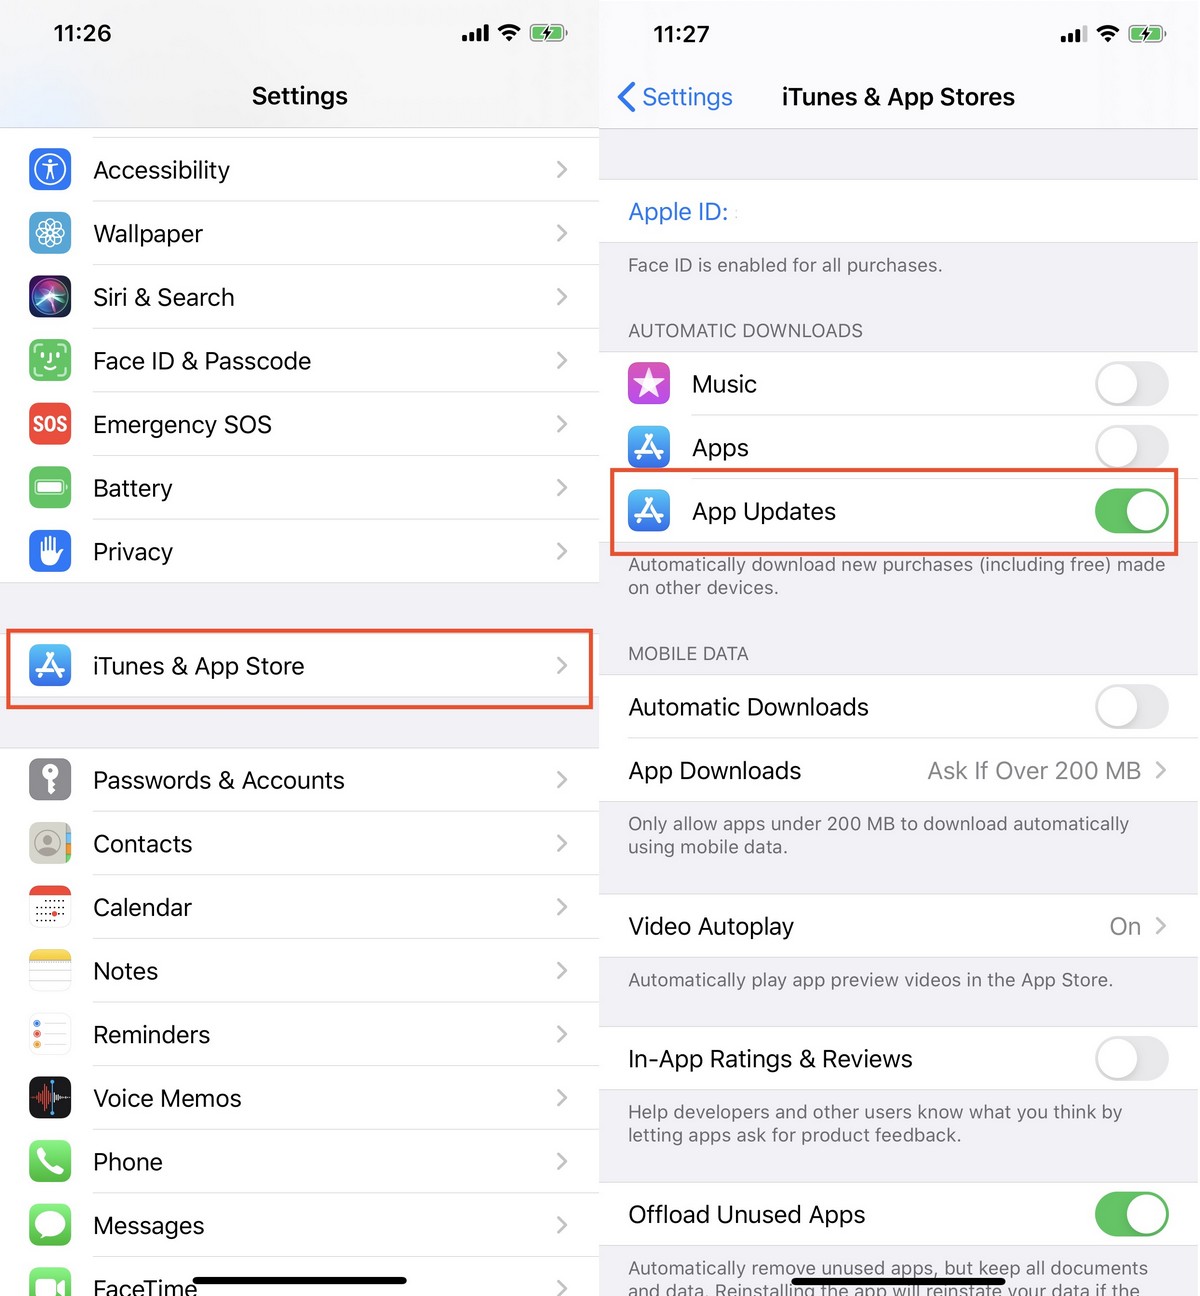
- Launch Settings
- Scroll down and go to iTunes & App Store
- Under “Automatic Downloads”, make sure the toggle on “App Updates” is on (it should be green if it’s on)
Thursday, January 16, 2020
How to connect ps4 controller
How to connect ps4 controller

Using the wireless controller
Press the PS button on the controller, and then select a user.
- The first time you use a controller, you'll need to pair it with your PS4™ system.
- Up to four controllers can be used at the same time. When you press the PS button, the light bar will glow in a uniquely assigned color. The color that is assigned depends on the order in which each user presses the PS button. The first controller to connect is blue, the second is red, the third is green, and the fourth is pink.
Pairing a device
The first time you use a controller or when you want to use the controller on another PS4™ system, you'll need to pair it with the system. Connect the controller to your system with a USB cable while the system is on.
When you want to use two or more controllers, you must pair each controller separately.
Charging
The controller battery charges when you connect the controller to your PS4™ system with a USB cable. The system must be turned on or in rest mode. The charge level of the battery appears on-screen when you press and hold the PS button.
While the system is in rest mode, the light bar slowly blinks orange. When charging is complete, the light bar turns off.
While the system is in rest mode, the light bar slowly blinks orange. When charging is complete, the light bar turns off.
- It takes approximately 2 hours to charge the controller when the battery has no remaining charge.
- Charge the controller when the temperature is between 10 °C and 30 °C (50 °F and 86 °F). You might not be able to efficiently charge the controller at other temperatures.
- You'll need to completely charge the controller at least once a year to keep it functioning properly.
- Battery life varies depending on how you use the controller and the environment in which the controller is used and stored.
- To charge while the system is in rest mode, select an option other than [Off] in
 (Settings) > [Power Save Settings] > [Set Features Available in Rest Mode] > [Supply Power to USB Ports].
Basic button operations
| PS button | Turn on your PS4™ system (when the PS4™ system is either off or in rest mode). Display the home screen (when the PS4™ system is turned on). |
|---|---|
| PS button (double-press) | Switch between applications in use. |
| PS button (long press) | Display the quick menu, with currently available commands and settings. |
| Directional buttons/Left stick | Select an item. |
 button button | Confirm the selected item. |
 button button | Cancel a command. |
| SHARE button | Display the menu for the Share feature. |
| OPTIONS button | Display the options menu with currently available commands. |
Basic touch pad gestures
You can use the touch pad and the touch pad button for various system functions. Available functions depend on the content in use.
| Tap | Briefly touch the touch pad. |
|---|---|
| Double tap | Tap twice in rapid succession. |
| Drag | Drag your finger while touching the touch pad, and then lift your finger. |
| Flick | Touch the touch pad, and then sharply and quickly move your finger off the touch pad. |
| Touch and hold | Touch and do not lift your finger. |
| Pinch in and pinch out | Place two fingers on the touch pad and move them closer together or further apart. |
| Click | Press the touch pad button. |
| Double-click | Press the touch pad button twice in rapid succession. |
Changing settings
To change speaker volume and other controller settings, select (Settings) from the function screen, and then select [Devices] > [Controllers].
(Settings) from the function screen, and then select [Devices] > [Controllers].- Depending on the game or application, you might hear audio sound effects from the controller's speaker.
- You can also adjust the speaker volume and related settings by selecting [Sound/Devices] on the quick menu.
How to see apple music replay
How to see apple music replay

How to visualize your Apple Music Replay and Spotify Wrapped year in review stats
As 2019 comes to a close, Apple Music and Spotify have both debuted year in review tools for subscribers. Spotify Wrapped and Apple Music Replay are available now, and allow you to view your most listened to songs, artists, albums, and more. Here’s how it works.
How to view your Apple Music Replay year in review
Apple Music Replay:

This is the first year that Apple itself has offered a way to view your most listened to songs, albums, and artists like Spotify Wrapped has done for years. Previously, this sort of Apple Music year in review functionality was only offered by third-parties.
The easiest way to view your Apple Music Replay year in review data is by visiting this link on your iPhone, iPad, or Mac. Once you sign in with your Apple ID, you’ll see a visualization of your most listened to songs, artists, and albums. Here’s what it looks like:
You can also add your Apple Music Replay playlists to your Apple Music library. This will add playlists of your most listened to songs to your Music app, dating back as far as you’ve been an Apple Music subscriber.
What differentiates Apple Music Replay from Spotify Wrapped, however, is that Replay will be continuously updated and can be accessed year-round. Spotify Wrapped is specifically for year in review purposes, but Replay will be continuously updated as you listen to Apple Music throughout the year.
Third-party:

While Apple Music Replay is the easiest and quickest way to view your Apple Music stats for 2019, there are third-party tools that offer even more data. Sam Gross offers an incredibly useful tool that visualizes your Apple Music year in review with even more data.
Gross’ tool works by analyzing a copy of your Apple Music data that Apple is required to provide under GDPR legislation.
- Visit Apple’s Privacy portal, sign in
- Choose “Request a copy of your data”
- Tick the box next to “Apple Media Services information”
- Select “Continue”
- Select “Complete Request”
Once you’ve submitted your request, Apple will prepare a download and notify you via email once that download is ready. For me, it took around 4 days for Apple to create the download. Once Apple has prepared your download, you’ll receive an email notification. In the email, click “Get your data” and then choose the download option.
The download will come as .zip file. You’ll need to unzip the main download, then unzip the “App Store iTunes Store iBooks Store Apple Music” file.
Next, navigate to the “Apple Music Activity” folder and look for the .csv file named “Apple Music Play Activity.” Now, go to Gross’ Apple Music Analyzer webpage and upload that .csv file. Once you do that, you’ll see a full rundown of all sorts of neat statistics.
Gross’ tool shows your most listened to song on Apple Music since Apple Music launched in 2015, as well as the songs you listened to most each year. You can also see the total amount of time you’ve spent listening to Apple Music, the day you spent the most time playing music, and much more.
This isn’t as streamlined or as quick as Apple Music Replay, but if you want to get as much data as possible on your listening habits, it’s a fun thing to do alongside Replay.
How to find your Spotify Wrapped year in review
Now, if you’re a Spotify user, Spotify Wrapped has officially gone live for 2019 and it’s easier than ever to view your statistics.
In the Spotify app, simply look for the “Wrapped 2019” graphic. It should appear directly in the “Home” tab of the app, or you can head to the “Search” tab and look for it under “Browse all.” Here, you can view not only your top artists, tracks, and more of 2019, but also your “Best of the Decade Wrapped.”
In the “Best of the Decade For You” Spotify Wrapped playlist, you’ll see a playlist of all your most listened to songs of the 2010s, which is pretty nifty if you’ve been a long-time Spotify subscriber.
Spotify has also launched its 2019 Wrapped for Artists feature. This lets artists themselves view insights into how many listeners they had in 2019 and more. Read more about 2019 Wrapped for Artists here. There is also Wrapped for Podcasters
Wrap-up
Have you taken a look at your Apple Music Replay and Spotify Wrapped year in review data? Be sure to report back with your results down in the comments if so!
Wednesday, January 15, 2020
How to print labels from excel
How to print labels from excel

How to Print Labels From Excel
Instructions for Excel 2003 through 2016
Having neat columns and rows, sorting abilities, and data entry features, Excel might be the perfect application for entering and storing information like contact lists. Once you have created a detailed list, you can use it with other Microsoft Office applications for numerous tasks.
:max_bytes(150000):strip_icc():format(webp)/make-labels-with-excel-4157653-final-373d886d5d5c4402a89a6433bab64fc1.png)
With the mail merge feature in MS Word, you can print mailing labels from Excel in a matter of minutes. Learn how to print labels from Excel depending on which version of Office you are using.
Notes:-These initial steps apply to Microsoft Excel 2007, 2010, 2013, and 2016. For Excel 2003 instructions, scroll further down.
Prepare the Worksheet
:max_bytes(150000):strip_icc():format(webp)/PrepareWorksheetinExcelHeadings-5a5a9b984e46ba0037b886ec.jpg)
To make mailing labels from Excel, your spreadsheet must be set up properly. Type in a heading in the first cell of each column describing the data in that column clearly and concisely. Make a column for each element you want to include on the labels. For instance, if you want to create mailing labels from Excel, you might have the following column headings:
- Title (Mr./Ms./Dr.)
- First Name
- Last Name
- Street Address
- City
- State
- ZIP Code
Enter the Data
:max_bytes(150000):strip_icc():format(webp)/PreparetheWorksheet2-5a5a9b290c1a82003713146b.jpg)
Type the names and addresses or other data you want when you print labels from Excel. Make sure each item is in the correct column. Avoid leaving blank columns or rows within the list. Save the worksheet when you have finished.
Confirm File Format
:max_bytes(150000):strip_icc():format(webp)/ConfirmFileFormat-5a5a9d3c494ec90037fc42b9.JPG)
The first time you connect to an Excel worksheet from Word, you must enable a setting that allows you to convert files between the two programs.
- In Word, click on the File tab and choose Options at the bottom of the left pane.
- Click Advanced in the left pane of the Word Options window and then scroll down to the General section.
- Make sure the Confirm File Format Conversion on Open is selected and click OK.
Set Up Labels in Word
:max_bytes(150000):strip_icc():format(webp)/WordLabelSetup-5a5a9c5d0d327a0039f1060f.JPG)
- Open a blank Word document.
- Go to the Mailings tab, choose Start Mail Merge and click on Labels.
- Choose the brand in the Label Vendors box and then choose the product number, which is listed on the label package. You can also select New Label if you want to enter custom label dimensions.
- Click OK when you are ready to proceed.
Connect the Worksheet to the Labels
:max_bytes(150000):strip_icc():format(webp)/ConnecttheWorksheettotheLabels-5a5a9ecc845b3400372dd1e2.jpg)
Before performing the merge to print address labels from Excel, you must connect the Word document to the worksheet containing your list.
- On the Mailings tab, click Select Recipients in the Mail Merge group and choose Use an Existing List.
- Navigate to the Excel worksheet containing your list in the Select Data Source window that opens and click Open.
- Click OK to confirm that you want to use the list and click OK again to select the table containing your list. The page will now be filled with labels that say «Next Record».
Add Mail Merge Fields
:max_bytes(150000):strip_icc():format(webp)/AddressblockinWordmailmerge-5a5a9fa5beba33003625c32c.JPG)
This is where those headings you added to your Excel worksheet will come in handy.
- Click on the first label on the page and then select Address Block in the Write & Insert Fields section of the Mailings tab.
- Click the Match Fields button on the Insert Address Block dialog box that appears.
- Make sure your headings correspond with the required fields. If any of them are incorrect, use the drop-down arrow beside it to match up to the correct field.
- Click OK. Click OK again to close the dialog box and then click Update Labels in the Write & Insert Fields section of the Mailings tab.
Perform the Merge
:max_bytes(150000):strip_icc():format(webp)/FinishmergetomakelabelsfromExcel-5a5aa0ce22fa3a003631208a.JPG)
Once you have the Excel spreadsheet and the Word document set up, you can merge the information and print your labels.
- Click Finish & Merge in the Finish group on the Mailings tab.
- Click Edit Individual Documents to preview how your printed labels will appear. Select All and click OK.
A new document opens with the mailing labels from your Excel worksheet. You can edit, print and save the labels just as you would any other Word document.
Excel 2003
If you are using Microsoft Office 2003, the steps to make address labels from Excel are slightly different.
Prepare the Worksheet
:max_bytes(150000):strip_icc():format(webp)/Excel2003spreadsheetheadingsforlabels-5a5aa22e845b3400372e2e59.jpg)
To make mailing labels from Excel, your spreadsheet must be set up properly. Type in a heading in the first cell of each column describing the data in that column clearly and concisely. Make a column for each element you want to include on the labels. For instance, if you want to create mailing labels from Excel, you might have the following column headings:
- Title (Mr./Ms./Dr.)
- First Name
- Last Name
- Street Address
- City
- State
- ZIP Code
Enter the Data
:max_bytes(150000):strip_icc():format(webp)/EnterdatainExcel2003-5a5aa2b6d92b09003686c842.jpg)
- Type the names and addresses or other data you want when you print labels from Excel.
- Make sure each item is in the correct column. Avoid leaving blank columns or rows within the list.
- Save the worksheet when you have finished.
Start the Merge
:max_bytes(150000):strip_icc():format(webp)/MailMergeWord2003-5a5aa61f22fa3a003631b2fd.jpg)
- Open a new Word document.
- Go to the Tools menu, point to Letters and Mailings and select Mail Merge to open the Mail Merge task pane.
- Select Labels and click Next: Starting Document.
- Click Label Options to open the Label Options dialog box.
Choose Your Labels
:max_bytes(150000):strip_icc():format(webp)/ChooseYourLabels-5a5aa7a50d327a0039f236c9.jpg)
- Choose the brand in the Label Vendors box and then choose the product number, which is listed on the label package. You can also select New Label if you want to enter custom label dimensions.
- Click OK when you are ready to proceed.
Choose Your Source
:max_bytes(150000):strip_icc():format(webp)/SelectRecipientsWord2003-5a5aae594e46ba0037ba81e0.jpg)
Lifewire
- Click Use an Existing List under Select Recipients and then click Browse.
- Navigate to the Excel worksheet containing your list in the Select Data Source window that opens and click Open. The Mail Merge Recipients window opens.
- Make sure your data appears correct and click OK.
Arrange the Labels
:max_bytes(150000):strip_icc():format(webp)/Word2003addressblock-5a5ab0ac9802070037df7b11.jpg)
- Click Next: Arrange Your Labels.
- Select Address Block.
- Click the Match Fields button on the Insert Address Block dialog box that appears.
- Make sure your headings correspond with the required fields. If any of them are incorrect, use the drop-down arrow beside it to match up to the correct field. Click OK.
- Click Update All Labels under Replicate Labels in the Mail Merge dialog box.
Preview and Finish
:max_bytes(150000):strip_icc():format(webp)/PreviewandFinish-5a5ab16faad52b003789654c.png)
Lifewire
- Use the arrows under Preview Your Labels to make sure they appear correctly.
- Click Next: Complete the Merge.
- If you want to make any changes, click Edit Individual Labels.
- When you are satisfied with the merge, click Print to print your address labels from Excel.
More Than Just Labels
Play around with the mail merge feature in Word. You can use data in Excel to create everything from form letters and envelopes to emails and directories. Using data you already have in Excel (or can enter into a worksheet quickly and easily) can make light work of typically time-consuming tasks.
Subscribe to:
Posts
(
Atom
)
-
ChomChom Roller Dog Hair Remover, Cat Hair Remover, Pet Hair Remover Revlon One-Step Hair Dryer & Volumizer Hot Air Brush, Black ...
-
10 Remedies And 8 Exercises To Get Rid Of A Double Chin Healifty V Face Band V Line Bandage Breathable Face Lift Belt Anti Wrinkle Ch...


How to moisturize vagina
How to moisturize vagina Vaginal Dryness: Causes and Moisturizing Treatments IN THIS ARTICLE Causes Diagnosis Medication Oth...