Thursday, March 21, 2019
How to build a chicken coop
How to build a chicken coop

How to Build a Chicken Coop (The Complete Step by Step Guide)
Building a Chicken Coop!
Once you have decided you want to raise chickens, you will have many questions:
- How can I build a chicken coop?
- Where do I purchase/find hens?
- How do I feed and raise my hens?
A chicken coop is a home for your hens. Somewhere to keep them safe from predators, warm during winter, dry during rain and somewhere safe to lay eggs.
For those ready to take the DIY plunge, it all starts with the right coop for your hens with step by step instructions. Don’t panic! Take a deep breath. Building a chicken coop does not have to be complicated or cost lots of money.
In this article we share my most recent experience of building one and a guide for you to build your own too.
Chicken Coop Checklist (Before you Start Building!)
When it comes to building your own coop, there are many advantages.
The first of which being you can build a coop to your and your hens’ exact needs. Want an extra nesting box, perch or more floor space? – easy, build it yourself!
You will also save money, have fun, and be able to modify your coop in the future; if your flock requires changes.
When building your own coop, you will want to print off this handy checklist below to make sure you build the perfect home for your hens.
| ITEM | WHY? |
|---|---|
| Coop Design | Must have sufficient space (i.e. square feet) for your hens, the correct number of nesting boxes and roosting space. Should be robust enough to prevent predators from gaining entry and draft free (i.e. keep elements out). |
| Location | Must be placed upon dry ground, with good drainage in a sunny place covered by shade. Should provide a good air flow (i.e. light breeze) to your coop to enable ventilation within the coop. |
| Accessibility | Should be very accessible for you to collect eggs and clean the coop weekly. |
| Materials | Must be made from non-toxic or corrosive materials to protect your hens. |
Chicken Coop Designs and Plans
Backyard chicken coop plans can range from small to large, a-frame to barn designs and many more variations.
The most common style and configuration is a traditional coop, with exterior nesting boxes and an open gable roof.
The most important factor amongst all the variety of sizes, shapes and styles is to build a coop which works for you and your hens.
The best advice is to browse lots of different coop plans. We have collected 44 free chicken coop plans; all of which have easy to follow instructions and will make selecting a coop design much easier. Whilst browsing the plans, note down the differences and what you like about them. Once you have selected a plan, remember these important tips:
- If you have free-range hens they will not require a run or tractor to be built
- If your hens are not free-range you will need to build a run and you will also require more space inside the coop (see size table below)
You should make sure your coop has the following for each hen.
| TITLE | SIZE |
|---|---|
| Coop | Minimum of three square feet per hen inside the coop (increase this to five if they are not free range. |
| Perch | Minimum of 10 linear inches per hen. |
| Run | Minimum of 25 square feet outside of the coop. |
| Nest Box | One square foot per nesting hen, ideally individual boxes. |
DIY Tools and Materials Required
The fastest and easiest material to build your coop from is wood.
All of the materials required are referenced in each stage as a “cut list”.
However, you have probably heard of DIYers making coops from just about anything; wooden pallets, corrugate roofing and rubber tyres.
I would recommend you stick to the basics. Wood is cheap, fast to build with, durable and easy to paint. Before starting to build your chicken coop, you should prepare a list of all the tools required.
I have listed below the tools I used recently to build my own coop.
| TOOLS REQUIRED |
|---|
|
How-to Build a Chicken Coop (Step-by-step)
Below, I’ve included a step by step guide with pictures which will make building a coop easy for someone without any DIY experience.
Chapter 1: Building a Frame

Once you have chosen your design, the first stage to making your coop is to build the frame. The frame is the structure of your coop.
Step 1: Build Two Sides of Your Coop
| NAME | QTY AND SIZE |
|---|---|
| Side Batten | 4 x 72”x3”x2” |
| Vertical Batten | 6 x 42.5”x3”x2” |
Once you have cut the side and vertical battens, fix them together with screws making sure the side battens run parallel and vertical batten 5 and 2 are fixed 21” from vertical batten 6 and 1 (see diagram below).
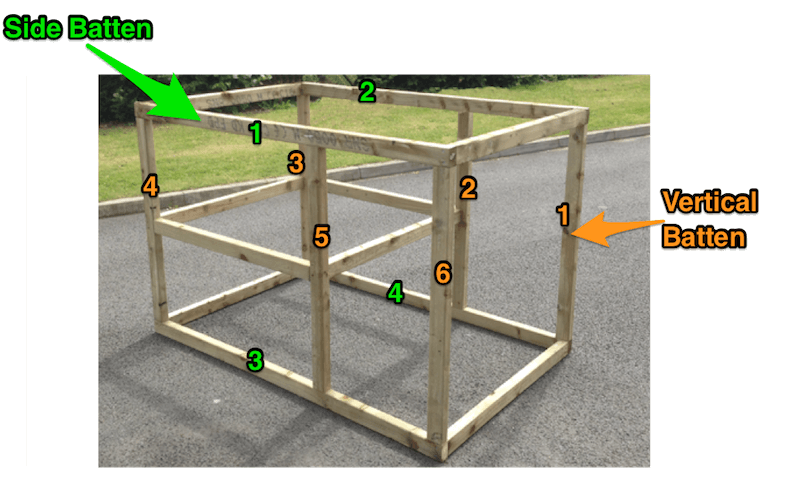
Top-Tip!
To make sure the side of the frame is square, place it on a flat surface and measure across the diagonal of the frame. You should measure both of the diagonals (top right to bottom left and top left to bottom right) to check that the diagonal lengths match.
Step 2: Joining Sides Together
| NAME | QTY AND SIZE |
|---|---|
| Connecting Batten | 4 x 42.5”x3”x2” |
| Lower Lumber Batten | 4 x 42.5”x3”x2” |
To join the sides together you will need to fix all 4 connecting battens on the inside of each joint. Screw through from the side battens into the connecting battens. Finally, fix the 4 lower lumber battens on the outside of vertical battens 2,3,4 and 5 approximately 19.5” from the floor.
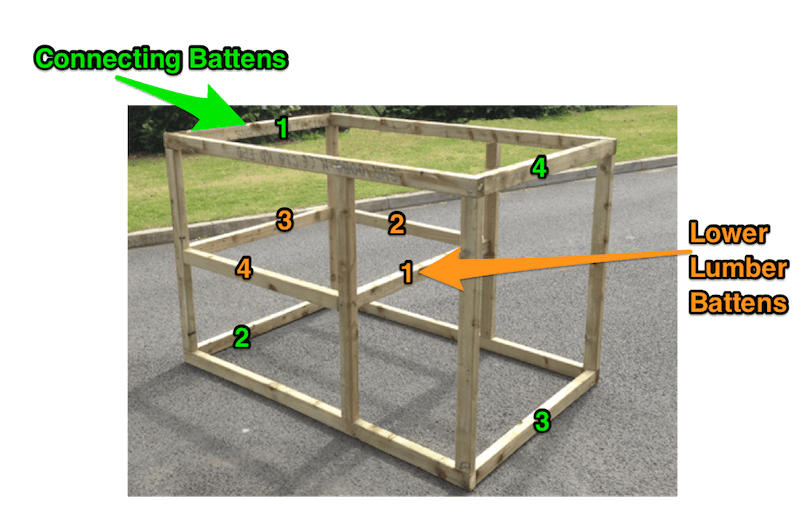
Congratulations, you have now completed your coop frame.
Chapter 2: Building a Roof for your Coop
Now you have completed the frame of your coop, it’s time to build the roof. Let’s start by making and fitting the roof trusses.
Step 1: Build and Fit Roof Trusses
| NAME | QTY AND SIZE |
|---|---|
| Roof Trusses | 6 x 32”x3”x2” @ 45-degree angle |
Take two roof trusses (battens) and screw them together through the 45-degree angle to create triangles (without bases). This creates your roof trusses, once you have made all three screw them into the coop frame directly above the vertical battens.

Step 2: Fix Ridge Rail
| NAME | QTY AND SIZE |
|---|---|
| Large Ridge Rail | 1 x 43”x3”x2” |
| Small Ridge Rail | 1 x 23”x3”x2” |
To complete the roof structure, simply screw the large and small ridge rail in-between the roof trusses with the 3” section of the rail on the right side. Screw through the roof trusses into the ridge rails.
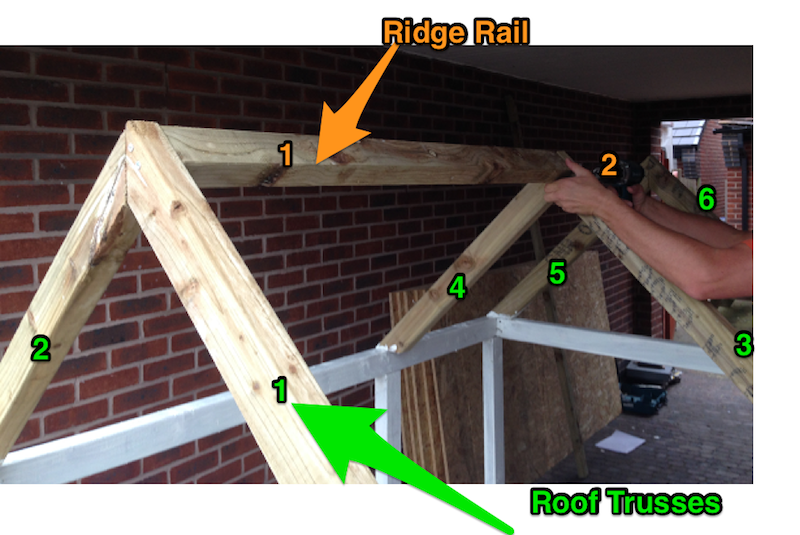
Congratulations you have now completed the roof frame of your coop. You will no doubt be able to see it taking shape and can already picture your hens in there!
Top-Tip!
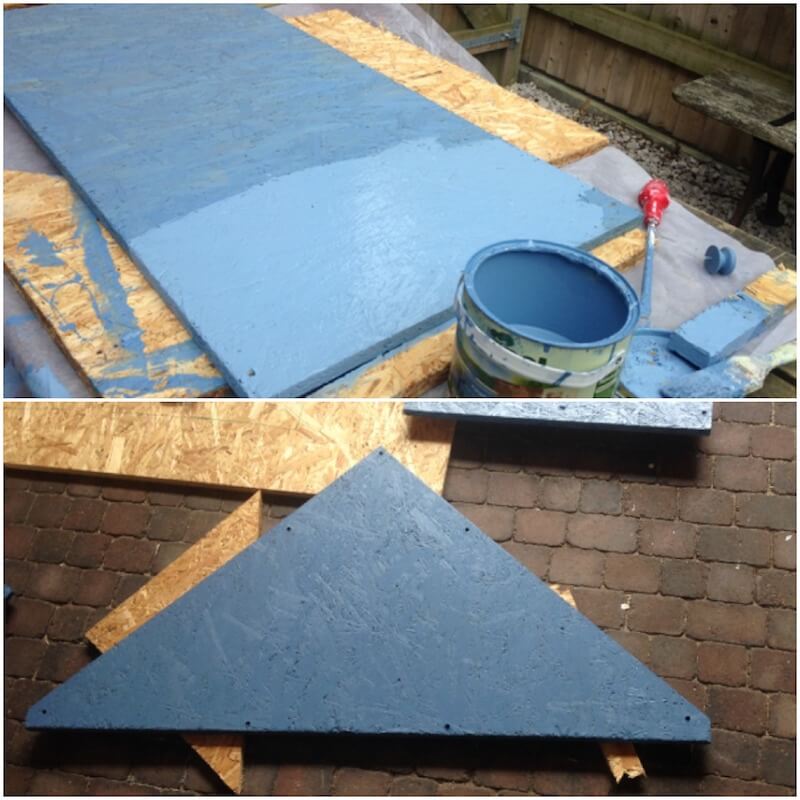
I decided at this point to paint the frame of the coop (excluding the roof trusses), as it’s much harder to paint when all the panels have been fitted.
Chapter 3: Roof and Frame Panels
It’s now time to fit the roof panels and coop frame panels. At the moment, you have a skeleton of a chicken coop.
Once you have cut and fitted the panels you will have a complete coop!
Step 1: Cut Fit Roof Panels
| NAME | QTY AND SIZE |
|---|---|
| Roof Panels | 1 x 76” x 37” 1 x 76” x 36” |
Take two Oriented Strand Boards (“OSBs”) and cut them to the sizes above. After you have finished cutting the panels, use a piece of sandpaper to smooth down any splinters and rough edges. Countersink and screw both the roof panels to the roof trusses and side battens every 12”. Your coop should now look like:

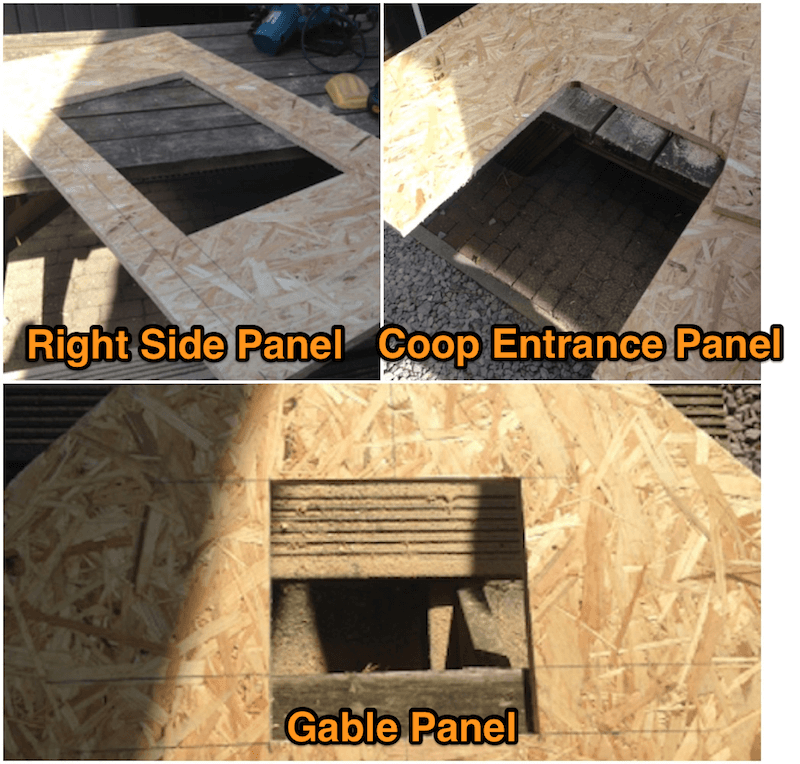
Step 2: Cut and Fit Coop Frame Panels
Now the coop frame has been built and your roof is fitted, let’s start to panel the frame of the coop.
Now the coop frame has been built and your roof is fitted, let’s start to panel the frame of the coop.
| NAME | QTY AND SIZE |
|---|---|
| Side Panel | 2 x 48” x 23” |
| Floor Panel | 1 x 47” x 46” |
| Gable Panel | 1 x 48” x 46” |
| Coop Entrance Panel | 1 x 42” x 43” |
| Front Panel | 1 x 46” x 24” |
Cut the 5 panels required using the sizes specified above. After you have finished countersinking the side panels, you can screw them to the coop.
Once the side panels are fitted, you are going to fit the floor panel into your coop. Now the floor has been inserted, screw the floor panel into the frame of the coop. Proceed to countersink and then screw the floor into the frame.

Now it’s time to fit two more panels to the coop.
Let’s start with the gable panel and entrance panel. Cut the panels from your Oriented Strand Boards, using the cut table above, and proceed to countersink and then screw.

Now, there is one remaining piece of panelling to measure cut and fit; the front panel.
Now fit the front panel to the coop frame.

Step 3: Cut Openings in the Panels
Once the coop has been panelled it is time to cut all of the openings into the panels; such as the coop door, nesting box and cleaning access:
- Coop Entrance Panel – opening hatch of 14” wide and 18” high (in the middle)
- Gable Panel – ventilation hole of 8” square (towards the ridge)
- Right Side Panel – access hole of 24” wide and 14” high (optional)
Chapter 4: The Final Touches (Painting, Fencing, Nesting Boxes)
Now you have a finished coop, but, without the detail. The final touches are the most important ones!
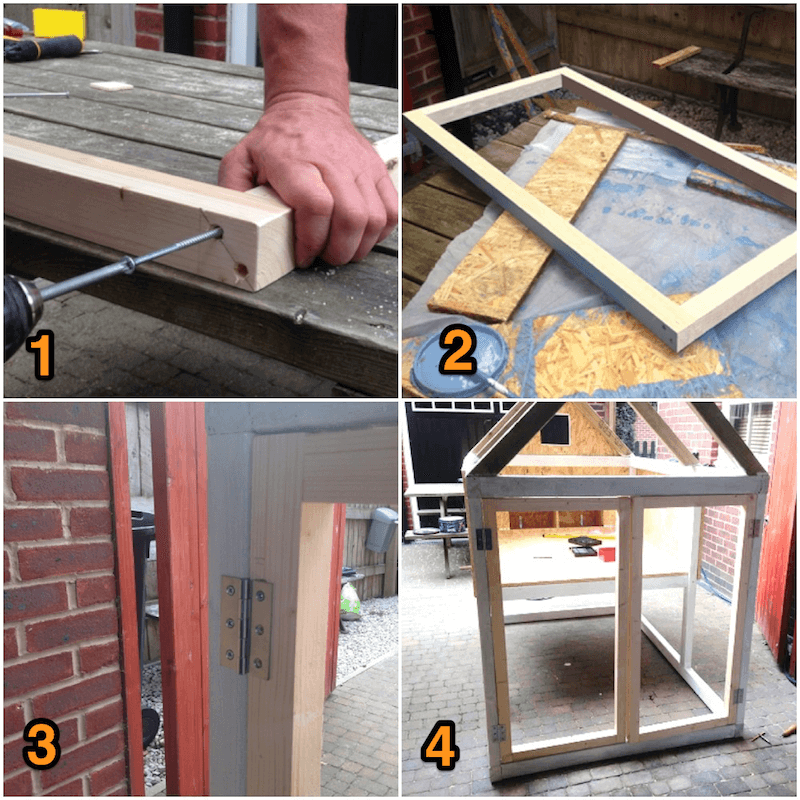
Step 1: Cutting and Fixing the Coop Doors
| NAME | QTY AND SIZE |
|---|---|
| Vertical Door Batten | 4 x 42”x1¾”x1¾″ |
| Horizontal Door Batten | 4 x 17½”x1¾”x1¾″ |
Once you have your battens cut to size you can make the coop doors.
Each coop door is made from two vertical door battens and two horizontal door battens.
Take a horizontal door batten and on each end apply PVC glue. Next, take a vertical door batten and screw through the side of the vertical door batten into the horizontal door batten. Repeat this process for both sides of the door.
You now need to repeat this process to make your second door.
Once you have built the doors, they will need hanging. To hang the doors, you need to fit the hinges to the doors and then to the frame of the coop.
Step 2: Building a Nesting Box
Your chicken coop is really starting to take shape!
It’s time to build the nesting box.
Chicken Nesting Boxes 101 and 13 Best DIY Plans
Nest boxes aren’t essential for hens to lay eggs, they can (and do) lay where they feel secure.
The nesting box is essential for you, the flock keeper, unless you enjoy searching the yard, outbuildings and under every bush or overhang for eggs!
In this article we cover the basics of nesting boxes including: best placement, recommended sizes, and how many you need for your flock.
We then present both, shop bought solutions, and also DIY plans with simple step-by-step instructions so you can build your own. We will show you the various types and explain their advantages and disadvantages.
Chicken Nesting Boxes 101

The nesting box requires a few things to make it attractive to a hen, it needs to be:
- Quiet
- Safe
- Darkened
- Private
These four things will encourage her to use the box to lay her eggs. If you place the box in a noisy, busy area where everyone can see her, she is not going to use it. A girl needs her privacy for some things!
Placement
Ideally the boxes will be placed in an area of the coop that is fairly dark and not too busy. The height of the nest box should be no less than 18 inches from the floor and can be as high as a few feet off the ground.
They should not be at the same height as your roosting bars or you may find your hens sleeping in the boxes! Although this is not a major catastrophe, you will get tired of mucking out the nest boxes each morning.
How Many Nesting Boxes Do You Need?

There really isn’t a definitive consensus of opinion on how many nest boxes you should have for your flock.
A couple of Government websites stated one box to 7 hens, however most people go by one box for every 3-4 hens. This number is in line with the ‘5 Freedoms’ recommended by animal welfare groups. If you want your flock to be ‘certified humane’you must have one for every five hens minimum.
I can promise you one thing, no matter how many boxes you build, it will not be enough! They will all want that one box all at the same time.
Size
A standard nest box for regular chickens such as Leghorns, Sussex, Plymouth Rocks and hybrid layers needs to be a 12 inch cube; 12 inches tall, wide and deep. This will fit the average hen quite nicely.
Larger birds such as Jersey Giants will need 12 inches deep, 14 inches wide and 12 inches tall. Bantam hens can get away with a slightly smaller box of 10 inches deep, 12 inches wide and 10 inches high.
These measurements make the box snug and there are reasons for that. If the hens have too much room they tend to kick out the bedding material. It also discourages hens from bunking up together to lay eggs.
Which Nesting Materials to Use?

There are lots of different nesting materials you can use. Below we are going to run through the most popular materials used.
- Pine shavings: easy to find, most farm stores sell them in convenient bales.
- Straw: another favorite of chicken keepers. You can usually buy these from your local farmer or farm store.
- Pine needles: free for the taking if you have a local source! The softer pine needles are the best.
- Sawdust: can be obtained for free or very cheaply from a sawmill or perhaps a neighbor.
- Leaves: raking and gathering all the fallen leaves in the autumn will not only give your ladies free bedding, but give you a workout too.
- Nesting pads: can be bought from most hatcheries and online sources. They are washable and inexpensive.
Any and all of these can be used for nesting materials, either separately or together. When supplies are good I will fill a couple of boxes with pine needles, a couple with leaves and a couple with straw.
As always – they will all want the same box!
To encourage the hens to relax while laying and also to deter pests, add some fresh herbs to the boxes. Lavender aids relaxation while lemon balm gives a fresh lemony smell and deters pests too.
Training Hens to Lay in them
Training your hens to use the boxes really isn’t that difficult, but you must start training before they start to lay.
Placing a golf ball, ping pong ball or fake egg in the nest boxes usually gives them the right idea.
They may not get it right immediately, but will eventually get the hang of it and use the boxes accordingly.
If you have hens that just will not use the boxes, try to think if there is a reason why. Is it too public? Too noisy? Perhaps you don’t have enough nest boxes for your ladies. Try to remedy any short comings that you find, but if they still refuse to use the boxes, try a different approach.
Keep them locked in the coop until they have laid eggs; make sure only the nesting boxes have bedding. Do this for a few days and then see what happens when you let them out.
There are hens that will steadfastly refuse to use nest boxes and nothing you can do will make them do otherwise. Newer hens that have been integrated with older hens will get the idea very quickly and you really don’t have to do anything for them.
Readymade Nest Boxes
If you aren’t very DIY or simply don’t have enough time to make your own, then shop bought nesting boxes will work for you.
They can be built from wood; however the metal and plastic varieties are more common.
Ready-made plastic laying boxes are generally the cheapest ones on the market; they are ideal for beginners and small flocks.
As you buy them individually, it gives you the flexibility to fix them to the outside of the coop or other suitable locations (such as nearby trees or outbuildings).
Also, being plastic makes them very easy to clean.
Metal
Metal boxes are the chosen type for small to mid-sized flocks. They are easy to clean, withstand a lot of abuse and are relatively lightweight when compared to wood.
You will generally find as well that metal nesting boxes are sturdier than their plastic or wooden counterparts; making them more suitable for larger breeds such as Jersey Giants.
Conventional nest boxes are sold singly, but most metal come in multiples of 2-10 boxes.
There is also the ‘rollaway’ nest box.
They can be made out of either plastic of metal; however the metal ones are generally much better quality.
A rollaway box has a slightly slanted floor which encourages the egg to ‘rollaway’ from under the hen. This prevents pecking or accidental breakage from trampling and keeps the egg much cleaner.
The eggs roll away to either the front or back of the box for easy collection by you.
13 DIY Chicken Nesting Box Plans
This is the fun part! What can you use to make nest boxes for your hens? The list of possibilities is almost endless – some folks have been very innovative.
You can even make your own rollaway boxes if you so desire!
This should give you a general idea of what’s available for use. In a pinch an old cardboard box will do, but they won’t stand up to too much usage. When making your boxes, ensure they have a steep pitch to the roof so that the hens can’t roost on top of them.
Unless you use ‘open plan’ boxes, the nest box should have a 4 inch lip to make sure the egg doesn’t roll out and break.
Accessorize Your Nesting Box
You can take any of the plans above and turn them into a unique design with some simple accessorizing.
Curtains! Hens do like privacy when laying their egg, so hanging a simple curtain over the entrance will do a good job of screening her from prying eyes.
You do not have to get the sewing machine out for these curtains. They can be as simple as burlap sacking, feed sack, old napkins from the ‘nearly new’ shop or old tea towels you no longer use. They can be held in place by staples or a push pin – it doesn’t need to be fancy.
Summary
If your hens are anything like mine, they will all want the same box at the same time! Failing that, they will lay elsewhere and make you hunt for the eggs. Although mine have been trained to use boxes they still occasionally lay somewhere else if it pleases them.
Accordingly, I have made a few extra cozy corners that they can use if they want to. I am lucky to be able to accommodate them in this way, not everyone has sufficient room to do this.
Unless you use ‘open plan’ boxes, the nest box should have a 4 inch lip to make sure the egg doesn’t roll out and break.
So there you have it in a nutshell. They are relatively cheap to buy, even easier to make and essential for you if you don’t want to play hide and seek with your hens!
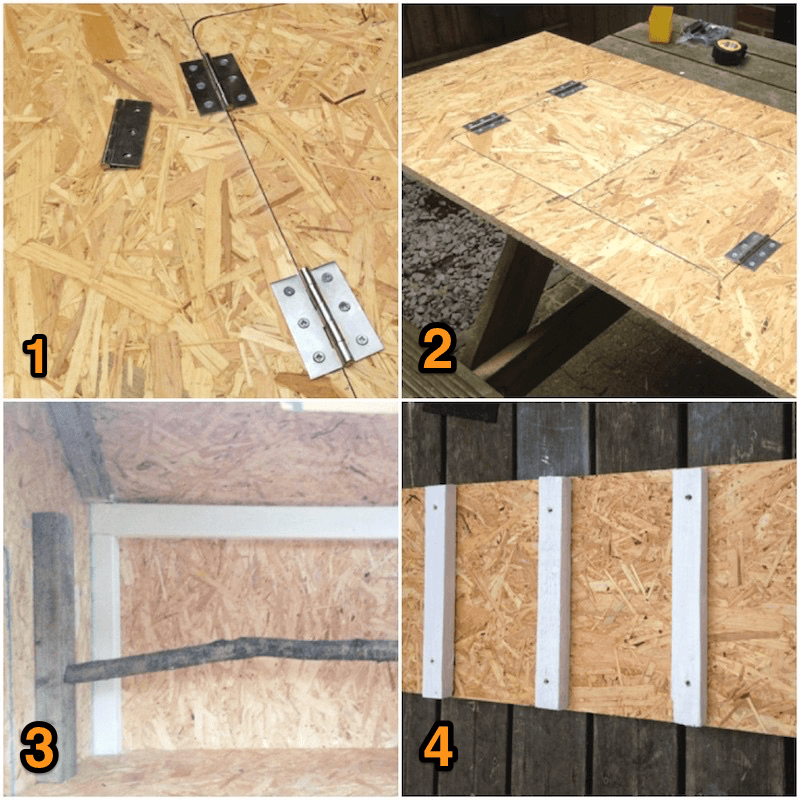
Step 3: Fixtures and Fittings
Let’s begin by fitting the entrance door to the coop entrance panel.
Remember the piece of wood you cut out of the coop entrance panel?
Grab it, add a couple of hinges and you have a small door for your coop.
Now the coop entrance panel is complete, let’s turn our attention to the side panel. You will want to take the right-side panel where you previously cut a door opening. Grab it, add a couple of hinges and you have a small access door for your coop.
Top-Tip
You can choose to add barrel bolts to both doors to fix them in place.
When I was building the coop, I wanted to make the roost as natural as possible, so I decided to make the roosting bar from a tree branch.
First, I cut a branch off one of my trees.
When looking for a branch, try to find one that has a 1″ diameter, and cut the branch to 44″ long. I then screwed this into my coop.
Finally, for the coop ramp. I took an offcut from the previously used OSB, and cut a piece to measure 32”x11”. I then added a base block and four steps.
Step 4: Paint Time!
Congratulations, your chicken coop is getting very close to being finished. Now you need to strip the coop down and paint the panels in the color of your choice.
This is a really easy and fun stage!
You can choose any color you like, just make sure the paint is suitable for outside use. I went with a multi-surface weather shield which guaranteed 6 years of weather protection.
Step 5: Fixtures and Fittings
Your coop is really starting to take shape now! You are now going to felt and shingle your roof.
Start by felting one side of the roof.
Once you’ve nailed the top of the felt down, you can nail the right and left sides of the felt down, spacing the nails approximately every 10 inches.
Now you have finished felting one side of the roof panel, you need to take the second piece of roofing felt and repeat this process to felt the right roof panel.
Once the second piece of felt is nailed in place, you will notice that the ridge of the roof is still not covered in felt. You need to take your third piece of roofing felt and place this over the middle of the roof.
At this point your chicken coop roof is waterproof, so if you’re on a limited budget you can leave the roof like this. However, I decided to add roof shingles to make it look nicer.
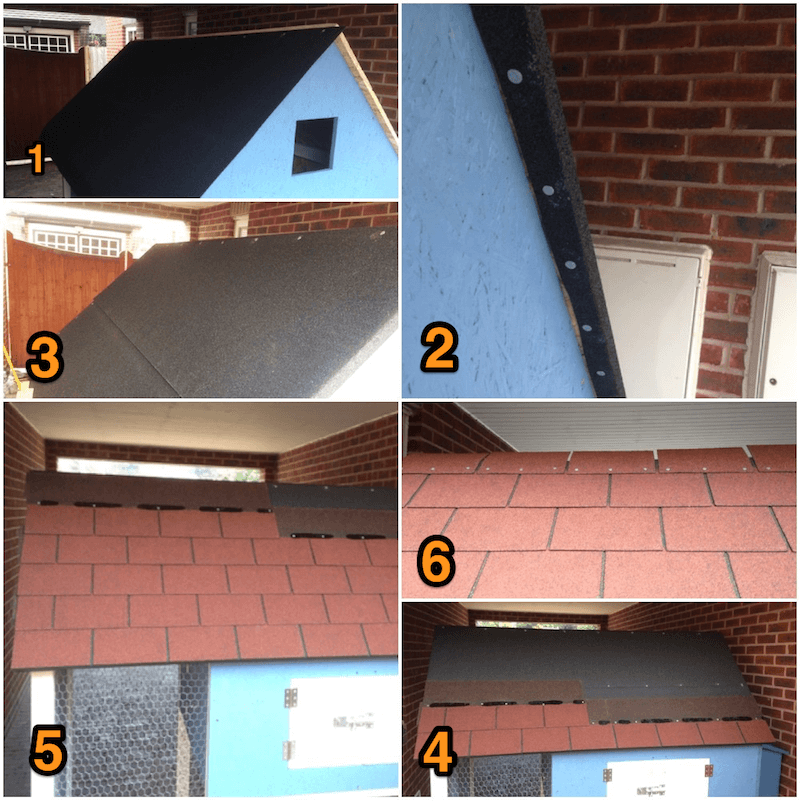
Step 6: Installation of Hardware Cloth
After you’ve finished painting, to fence your coop use either hardware cloth or chicken wire. I purchased galvanized chicken wire which was 24″ tall and 25 feet long.
Proceed by fitting mesh to each part of the frame which doesn’t have a panel or door.
Use wire cutters to cut the piece of mesh from the roll and U-nails to fix it to your coop. You now have a finished home for your hens!

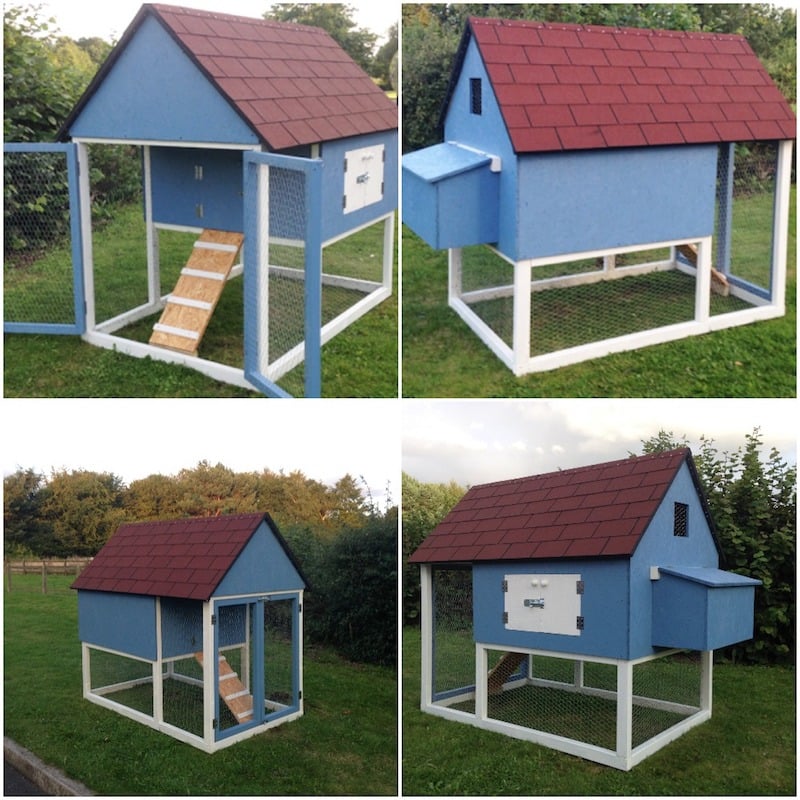
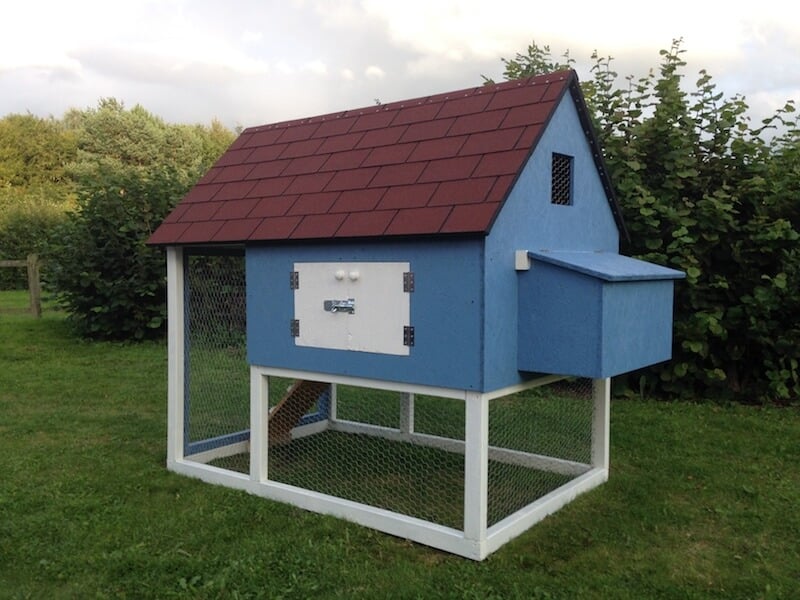
Finished Coop Pictures
Subscribe to:
Post Comments
(
Atom
)
-
ChomChom Roller Dog Hair Remover, Cat Hair Remover, Pet Hair Remover Revlon One-Step Hair Dryer & Volumizer Hot Air Brush, Black ...
-
10 Remedies And 8 Exercises To Get Rid Of A Double Chin Healifty V Face Band V Line Bandage Breathable Face Lift Belt Anti Wrinkle Ch...


How to moisturize vagina
How to moisturize vagina Vaginal Dryness: Causes and Moisturizing Treatments IN THIS ARTICLE Causes Diagnosis Medication Oth...


No comments :
Post a Comment