Wednesday, December 11, 2019
How to find bank branch number
How to find bank branch number

How to Find the Branch Number of a Bank
Your checks contain important information you'll need when sending and receiving funds. A bank's branch number, which is different than either its routing number or your account number, is used to identify different branch locations in the same area. You can find a bank's branch number in several locations.
How to Find the Branch Number of a Bank
You can find your bank's branch number in the following ways:
- Look on your checks for the bank in question. The branch number is usually found in the upper right-hand corner, though this option is not available at all banks.
- You can usually find your bank's branch number on its website under frequently asked questions (FAQs).
- Call your bank's customer service department. The representative can provide the branch number where you first opened your account.
Why You Might Need the Branch Number
Some banks require that you provide the branch number when ordering checks, although this practice has been discontinued at some banks.
How to Find the Branch Number on a Check
Step
Start by finding the check number on your checks. The check number should be found in the upper right corner of your checks.
Step
Once you've found the check number, look below it and you should see a smaller number. This number is your branch number. It is usually two digits. It represents the branch you first opened your bank account at. For example, if you opened your bank account at your bank's first branch, the branch number would most likely be "01."
Step
If you can't find your branch number, it could be in another location on the check. Your branch number may also be located on the right hand side of the routing number.
Step
If you are using checks without check numbers, you might still be able to locate the branch number on the right hand side of the check.
What is a BSB number?
A BSB (short for Bank-State-Branch) is a six-digit number used by banks in Australia. A bank's BSB number distinguishes between banks and branches in Australia.
Thursday, December 5, 2019
How to shave your head
How to shave your head


When your dad taught you how to shave, he focused his lesson on the cheeks and chin. That was practical for the first decade or two of your shaving years, but what about the suddenly balding crown that you also inherited? (Or maybe you’ve got a bunch of hair but would prefer to channel The Rock’s bad-assery, or even Jeff Bezos’ I’m-the-bossery.)
Since you’re a big boy now, dad isn’t on hand to show you the ropes. Luckily, barber Eric Holmes is. Holmes gives stellar shaves at Blind Barber in Los Angeles, and he knows the ins and outs of shearing one’s own dome. In many ways, you’ll employ the same logic as with your facial hair, but not always. Pay close attention, and, as Holmes will remind you: Go slow.
Here are all the things you need to know before waxing poetic on your own head.
First, a note on razors
Holmes has seen guys shave their heads with just about every type of razor. If you want the best shave with a standard razor (as opposed to a straight razor or safety razor, for the real pros), then pick one with three to five blades, so that you can avoid having to go over any area more than once. Holmes doesn’t shy away from disposable blades here, since a one-and-done policy is good for the crown. In that case, you can stick with Schick’s Xtreme3 Sensitive Blades, which have a flexible head that slides with the contours of your head. Alternatively, sign up for a replenishment program (like Harry’s) to have clean blades—also with flexible heads—sent to you each month. Regardless of how frequently you shave, it’s important to avoid using a dull blade; it’ll drag along the skin and leave painful burn (and unshaved hair) in its wake.
How to shave your own head
1. Buzz it down
First things first: You’ll want to buzz all of your hair to a workable length. Get a no-frills electronic clipper set; we like Wahl’s Home Pro. Most guy will remove the guard and buzz all the way down, to minimize the amount of hair they will later drag with the razor, as well as to lessen any resistance to the blade. However, some guys will attach the smallest guard, so that the hair is short enough to shave, but still at a visible length—this way, if you’ve missed a spot after shaving, it’s easier to notice.
First things first: You’ll want to buzz all of your hair to a workable length. Get a no-frills electronic clipper set; we like Wahl’s Home Pro. Most guy will remove the guard and buzz all the way down, to minimize the amount of hair they will later drag with the razor, as well as to lessen any resistance to the blade. However, some guys will attach the smallest guard, so that the hair is short enough to shave, but still at a visible length—this way, if you’ve missed a spot after shaving, it’s easier to notice.
2. Rinse off in a hot shower
Just as when you shave your face, it’s best to soften the skin with warm or hot water. This will open your pores, relax your hair, and minimize friction and burn. In this case, it’ll also wash away any hair clippings that you just trimmed.
Just as when you shave your face, it’s best to soften the skin with warm or hot water. This will open your pores, relax your hair, and minimize friction and burn. In this case, it’ll also wash away any hair clippings that you just trimmed.
3. Exfoliate
While you shower, grab some gritty scrub—Raw Materials’ Skin Grit is liquid gold—and slather it onto your head. This will lift any dead skin, which will later prevent clogged pores and ingrown hairs. The shave itself is an exfoliating procedure, but you don’t need excess dead skin causing additional problems during the main event.
While you shower, grab some gritty scrub—Raw Materials’ Skin Grit is liquid gold—and slather it onto your head. This will lift any dead skin, which will later prevent clogged pores and ingrown hairs. The shave itself is an exfoliating procedure, but you don’t need excess dead skin causing additional problems during the main event.
4. Apply a pre-shave oil
Holmes recommends using a pre-shave oil to help your razor glide more easily over the skin. This also creates a small protective barrier between the blade and the skin. It’s kind of like a janitor for your skin: If it does its job, you’ll never notice the difference. If you forego it…you may feel the burn later.
Holmes recommends using a pre-shave oil to help your razor glide more easily over the skin. This also creates a small protective barrier between the blade and the skin. It’s kind of like a janitor for your skin: If it does its job, you’ll never notice the difference. If you forego it…you may feel the burn later.
5. Lather up
Holmes isn’t particular about the kind of cream or gel you use to shave your head—it’s up to your personal preference. As a beginner, though, you may want to stick with something transparent, so that you can visualize the scalp as you shave it, noticing any contours or moles. Gillette’s Fusion ProGlide Gel is a surefire, see-through bet.
Holmes isn’t particular about the kind of cream or gel you use to shave your head—it’s up to your personal preference. As a beginner, though, you may want to stick with something transparent, so that you can visualize the scalp as you shave it, noticing any contours or moles. Gillette’s Fusion ProGlide Gel is a surefire, see-through bet.
Warm it up in your palms and apply it with some force. You want to work it into the scalp, says Holmes, to further guarantee comfort and closeness during the shave.
6. And… go!
The number-one thing to remember: Take your time. “Make sure you finish one area before moving on to the next,” says Holmes. “By going slow and not jumping all over the place, you should be able to get a good shave without any special mirror setup.”
The number-one thing to remember: Take your time. “Make sure you finish one area before moving on to the next,” says Holmes. “By going slow and not jumping all over the place, you should be able to get a good shave without any special mirror setup.”
Even then, you may want to invest in a handheld mirror, to more easily visualize the back of your head—whether you hold it up during the shave is a personal preference. You can also shave more easily with a tri-paneled bathroom mirror, positioning them to reflect off one another.
It’s very important to shave with the grain of your hair, as you would on your face, which prevents painful ingrown hairs. Gently pull the skin taut to avoid unnecessary grooves and obstructions.
As for the order of operations: “The best way is to start with the softer hair on the top of the scalp first, then the sides, then the back,” advises Holmes. “The sides and back tend to be thicker and, in saving them for last, you allow them to soften for a longer period of time under the shaving cream.”
And, as you would with a regular shave, rinse the blade in hot water after each stroke, to keep it unobstructed.
7. Rinse with cold water
When it comes to your pores, it’s the same logic (and opposite approach) once you’ve finished the shave. “Whereas warm water opens your pores, cold water closes them,” says Holmes. This will firm the skin and prevent blockage, as you wash away any hair, dead skin, and shave gel residue from your crown.
When it comes to your pores, it’s the same logic (and opposite approach) once you’ve finished the shave. “Whereas warm water opens your pores, cold water closes them,” says Holmes. This will firm the skin and prevent blockage, as you wash away any hair, dead skin, and shave gel residue from your crown.
8. Chase it with an aftershave lotion
Holmes recommends using an aftershave lotion or balm, as opposed to a gel or splash. It’s especially soothing for anyone with sensitive skin. However, most important is to banish any aftershaves containing alcohol—now, and forever. They dry out your skin and do more damage than good. Dove Men+Care has a great alcohol-free post-shave balm for sensitive skin. (And really, all of us have more sensitive skin up top, so it’s best to err with those kinds of products here.)
Holmes recommends using an aftershave lotion or balm, as opposed to a gel or splash. It’s especially soothing for anyone with sensitive skin. However, most important is to banish any aftershaves containing alcohol—now, and forever. They dry out your skin and do more damage than good. Dove Men+Care has a great alcohol-free post-shave balm for sensitive skin. (And really, all of us have more sensitive skin up top, so it’s best to err with those kinds of products here.)
9. Treat nicks and cuts
You might make a rookie error or two, but even the self-shaving veterans out there get a couple nicks along the way. You’ll minimize bleeding and promote healing with a styptic pen or alum block. Both will disinfect the cut and halt bleeding; this is one instance where it’s a-ok to spot-dry the skin, unlike when applying an aftershave to the entire head. Clubman Pinaud has a stellar [styptic pen], and [The Art of Shaving’s Alum Block] is a necessity for every man. Both of these will come in hand for any nicks to your face, or even a paper cut, pesky hangnail, etc.
You might make a rookie error or two, but even the self-shaving veterans out there get a couple nicks along the way. You’ll minimize bleeding and promote healing with a styptic pen or alum block. Both will disinfect the cut and halt bleeding; this is one instance where it’s a-ok to spot-dry the skin, unlike when applying an aftershave to the entire head. Clubman Pinaud has a stellar [styptic pen], and [The Art of Shaving’s Alum Block] is a necessity for every man. Both of these will come in hand for any nicks to your face, or even a paper cut, pesky hangnail, etc.
How to keep your bald head beautiful
“Men with shaved heads are at the greatest risk of skin cancer, age spots, and wrinkling,” says Heather Rogers, dermatologist at Modern Dermatology in Seattle. “Their heads get maximum exposure to the radiation of the sun.” For this reason, bald men should treat their scalp just as they would their face. Here’s a regimen that Rogers suggest to her bare-headed patients:
- In the morning, wipe the scalp with a warm wash cloth (unless you’re showering, which will also do the trick). You’ll use a cleanser in the evening, so you can avoid it in the morning.
- Next, apply an antioxidant serum, like [IS clinical Super Serum], to correct any existing damage while fighting against everyday environment strain.
- Then use an SPF-packed moisturizer—something with a matte finish, so that your dome doesn’t look overly polished. Rogers recommends [Brush on Block] for the best anti-shine application.
- And, since it isn’t going to mess up your hair, it’s always best to wear a hat.
In the evening, cleanse in the shower, but try to limit showering to just once a day, lest you dry out the skin on the scalp. Rogers likes Cetaphil cleanser, and suggests their wipes if you otherwise shower in the morning. Before bed, apply a retinol product, like MD Solar Science Evening Facial Repair Serum. “A little bit is all you need,” says Rogers. “It is a treatment, not a moisturizer. Use too much and you will get dry and irritated.” As you sleep, your cells turn over much quicker, so this is the best time to treat the skin on your head for signs of aging and sun exposure. If your scalp is ever too dry, use a dense moisturizer (like Baxter of California’s Skin Recharge Cream) to hydrate while you rest.
Tuesday, December 3, 2019
How long to cook turkey in electric roaster
How long to cook turkey in electric roaster

PERFECT TURKEY IN AN ELECTRIC ROASTER OVEN

READY IN: 4hrs 20mins
SERVES: 18
YIELD: 1 Turkey
UNITS: US
INGREDIENTS
1 whole turkey, thawed up to 20 lbs
1⁄4 cup olive oil or 1/4 cup butter
1 teaspoon seasoning salt
1 teaspoon poultry seasoning
1⁄2 teaspoon pepper
NUTRITION INFO
Serving Size: 1 (288) g
Servings Per Recipe: 18
AMT. PER SERVING
% DAILY VALUE
Calories: 482.9
Calories from Fat 232 g
48 %
Total Fat 25.9 g
39 %
Saturated Fat 6.9 g
34 %
Cholesterol 193.8 mg
64 %
Sodium 185.3 mg
7 %
Total Carbohydrate 0.1 g
0 %
Dietary Fiber 0 g
0 %
Sugars 0 g
0 %
Protein 58.2 g
116 %

DIRECTIONS
- Take the insert pan out of the roaster and pre-heat the roaster to its highest setting. On mine it's 450, but use 500 if your oven goes that high.
- Do not wash the turkey! The USDA says that washing it could cause a spread of salmonella poisoning. Sprinkle salt in the cavities. Stuff if desired. Don’t pre-stuff your turkey; mix and stuff ingredients immediately before roasting. Tossing in a few pieces of cut fruit or herbs is not considered 'stuffing.' Stuffing usually means filling up the cavity with about ¾ cup stuffing per pound of turkey.
- Rub the entire bird with olive oil or butter. Doctor up your bird with whatever special seasonings you wish. I always use poultry seasoning. Finish with a good sprinkle of seasoning salt and black pepper.
- I highly recommend using a wired thermometer so you can watch the temperature without lifting the lid. Your turkey will be done much earlier than the estimated cook time, so keep a sharp eye on that thermometer. If using a pop-up turkey plug type thermometer, those little pop-ups stick sometimes so you should really use two of them.
- Put the rack into the insert pan and make sure the handles are up, not tucked below. Put the bird in the insert pan on top of the rack. Don’t add water to the pan. Put the insert pan back into the roasting pan. If your roaster doesn't have an insert pan, it's ok - just be very careful putting the bird into that hot oven, you don't want to burn your hands on the sides of the oven! Cover.
- Roast at highest setting for 30 minutes. The butter/oil, seasonings and the searing time will make the skin beautifully browned and perfect!
- After 30 minutes, turn the oven temperature down to 325.
- The turkey will self-baste if you do not lift the lid, so you don't have to baste it every 20 minutes like you do in your conventional oven. DO NOT LIFT LID during cooking time! Lifting the lid will increase cooking time because roaster ovens lose their heat unlike regular ovens. I've read that roaster ovens effectively 'steam' the turkey making the meat come out -- well, steamed. This is not true as you will find out. Similar to the roasted chickens you can get at your supermarket, the bird will come out moist and perfectly roasted. Why do you think they call it a Roaster Oven?.
- Figure your total cooking time from the time you first put the bird in the roaster.
- FINAL TEMPERATURE FOR SAFETY AND DONENESS IS: 180 DEGREES IN THIGH AND 165 DEGREES IN BREAST AND STUFFING. Juices should be clear, not pink.
- Check your turkey EARLY. Really start watching the temp an hour before it's supposed to be done. Your turkey will almost certainly be done before the suggested cooking time. Watch your wired meat thermometer. If using a pop-up turkey plug type thermometer, check by lifting the lid quickly so the oven doesn’t lose its heat. If necessary, check after another 30 minutes, but I doubt you'll have to do that. I say check after 30 minutes because it's really OK to let the bird roast a little extra - you won't dry it out using my method if you let it go for 1/2 hour.
- When done, remove the turkey from the roaster, tent with foil, and let rest for 20 minutes. This allows the juices to really seep into the meat, so they say.
- If you try this method, please let us know your results!
- Happy Thanksgiving everyone!
How to carve a turkey
How to carve a turkey

How to Carve a Turkey, Step-by-Step

Here's how to nail the final frontier before you dig in.
You’ve bought it, stuffed it, cooked it, and now you have to carve it. If you’re daunted by the task―some of the best cooks are―just remember that carving a turkey comes down to simple technique.
How to get car unstuck from snow
How to get car unstuck from snow

5 Ways to Get Your Car Out of the Snow

Getting stuck in the middle of a big pile of snow or on a stretch of ice can be an all-too-common occurrence during the cold winter months. Luckily, we have a few tips and tricks that can get your car free in no time, even if you don’t have one of the best vehicles for winter driving. Here are some things you can do if your car is stuck in snow:
1. Clear a path around your tires
Try to dig snow and ice away from the drive tires. You want to free up a few feet in front of and behind the tires so you can move the car back and forth. Be sure to also dig out any snow under the front or middle of your car that is higher than its ground clearance.
Of course a shovel makes this much easier, so try and store one in your trunk along with some other winter emergency items if you plan on driving in snowy conditions.
2. Rock your car free of the snow
Carefully switching from drive to reverse can help dislodge some of the snow around your wheels. “You go into drive, then reverse, then repeat,” says Mark Osborne, who oversees Michigan Technological University’s Winter Driving School. “But you have to be careful not to wreck your transmission. I put my foot on the brake at the peak of each ‘rock,’ so the car is motionless when I change gears. It’s also helpful to shift to neutral for a second before making the transition.”
3. Don’t floor the gas
You’ll always be tempted to floor it if you’re stuck in snow or ice, but don’t. Go easy on the pedal to give the vehicle just a little gas for a moment, then let off. Repeat to enhance the needed “rocking” motion. It’s momentum that sets you free, not power.
4. Improve traction
If you still can’t get your car free, you can next try and improve traction under your wheels. Things such as sandbags, salt, dirt or even kitty litter can be used when your car is stuck in snow. Throw several handfuls under your tires for improved traction, then try the gas again.
It is also important to remember to turn off traction control if you are stuck in snow. This feature can help you keep control of your vehicle if you hit ice on the road, but leaving it on while stuck in snow is a different story. Traction control prevents wheelspin, which is the rotation of a vehicle’s wheels without traction, and can sometimes help you get your car out of snow.
5. Get others to help push your car
If you have other people in your car, or friendly onlookers who can help, simply pushing your car out of the snow can be an easy solution. Gently press the gas while the car is being pushed to add additional momentum. Safety always comes first, so make sure you’re in forward gear and the ground isn’t too slippery for helpers to push. Using snow chains can also help create traction under your tires, making it easier to move through snow and ice.
Always keep a cool head
Whether you’re stuck in snow or hit a stretch of ice, try and remain calm. Don’t do anything abrupt, like slamming the brakes. “If you do that, you’ll transfer your vehicle’s weight to your front wheels,” Osborne says. “That lightens up the rear, making it likely that your rear end will spin.” Instead, Osborne says, gradually let off the gas and hold the steering steady until you’ve cleared the ice.
How to curl hair with a flat iron
How to curl hair with a flat iron

How to Curl Your Hair Using Just a Flat Iron

If you’ve ever wanted to travel with just one hair styling tool, or simply want to declutter your vanity, odds are you’ve found yourself wondering if it’s possible to create a beautiful look wave or curl with just a flat iron – and of course it is!
Not only is it doable, but it’s also relatively simple to achieve beautiful beachy waves or tight spirals sans curling iron. In a few simple steps, celebrity hairstylist and Moroccanoil spokesperson Bryce Scarlett breaks down how you can achieve a classic curl and an S-wave with just your hair straightener.
How to get beach waves with a flat iron
Simply put, an S-wave makes your strands look like an "S." Depending on how you decide to create them, either glam or more laid-back beachy wave, they're fairly simple to create. Here, Scarlett breaks it down:
Step 1: Prep hair with a heat protectant, and “spray it throughout hair, from mid-length to ends,” says Scarlett. This will save hair from too much heat damage.
Step 2: Section hair. “Begin at the base of the head at the root and create small sections. Then divide hair into thin 1-inch wide sections,” says Scarlett. “Smaller sections will give a more textured, beachy wave. Larger sections will create a softer, smoother, more subtle S-wave,” he explains.
Step 3: Create soft bends. With your flat iron held horizontally, take a half-inch to two-inch sections of your hair and create a soft S-shape bend by clamping and pulling the flat iron it alternating directions through the strand (view a tutorial here). To achieve a blown-out look, Scarlett recommends bending the ends of your hair under, and for a more undone look, he suggests stopping before reaching your tips to leave out the hair's natural texture.
"The more repetitions you do, the beachier and more textured it will look, whereas bigger distances between the waves will give you a more soft, glamorous wave," he adds. To add volume, Scarlett suggests using a texturizing spray in each section, and to create a sleeker look, he recommends using a frizz control product instead.
Step 4: Add finishing touches with product. To add shine and define sections, Scarlett recommends using the Moroccanoil Luminous Hairspray Medium. For a softer look, he suggests swapping the hairspray for a dry shampoo and brushing through the hair with a brush (or your fingers!) to loosen the final look.
How to create classic spiral curls with a flat iron
"Achieving a proper curl with a flat iron is similar to the idea of curling a ribbon with a pair of scissors," illustrates Scarlett. "It is all about creating tension and the perfect angle on the hair and gliding through in such a way that gets the curl to bounce back."
Step 1: Apply a heat protectant. Make sure to apply it throughout your hair, from root to top, to help prevent heat-related hair damage.
Step 2: Twist and pull the flat iron through hair. Clamp hair in the flat iron and with the hair between the plates, rotate the flat iron at least 180º. "Begin at the base of the head at the root and create small sections, pulling the iron away from the face, from the crown through to the ends," says Scarlett.
To create a more natural and texturized look, alternate between twisting the iron away from your face and towards it. Continue through all sections of the hair. To create volume, Scarlett suggests teasing hair at the crown of the head and not brushing through finished curls.
Step 3: Set curls with hairspray. Spritz a medium-hold hairspray on the hair and with your fingers, work it into your curls to help elongate the life of your hairstyle without looking crunchy or too done.
How to install nest thermostat
How to install nest thermostat

How to Install the Nest Thermostat

Installing the Nest smart thermostat in your home can be simple - just follow these quick and easy steps and you'll be up and running.
Nothing better represents smart-home devices--gadgets that let you control appliances in your home via the Internet--better than the Nest Learning Thermostat. The next generation in home heating and cooling, the Nest not only lets you control the temperature via a smartphone app, but also learns your patterns, and will adjust the temperature accordingly. In doing so, Nest claims its device will save you money, as it won't heat or cool your home when you're not there.
But installing the Nest isn't as simple as screwing in a light bulb. It's not too hard, though, and we've created a step-by-step guide to help you through the process.
What you’ll need:
A Philips head screwdriver. Nest thoughtfully provides one with the thermostat, though you may need a smaller screwdriver to remove the wires from your old thermostat.
Total project time: About 30 minutes.
1. Turn off power to your thermostat.
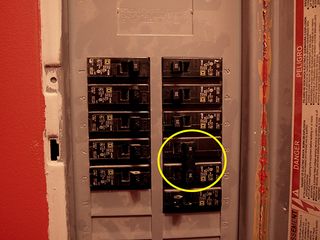
Locate the appropriate circuit breaker, and switch it to the Off position.
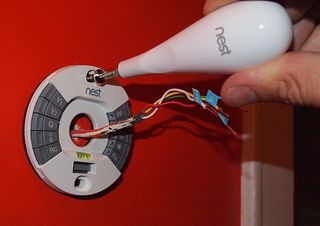
2. Label the wires leading into your old thermostat.
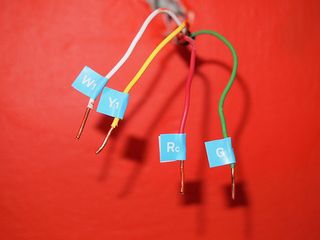
Each wire coming out of the wall should go into a specific labeled port on your old thermostat (R, Y, W or G, for example). Attach the blue stickers in the Nest installation guide to the corresponding wire. If you're lucky, the wires themselves will be color-coded.
If your thermostat is labeled 120 or 240v, or has thick wires, you have a high-voltage system—do not connect these wires to the Nest.
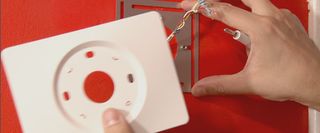
3. Remove your old thermostat.
Carefully remove the wires leading from the wall into the thermostat, and then unscrew the device from the wall.
4. Mark the position of the Nest.
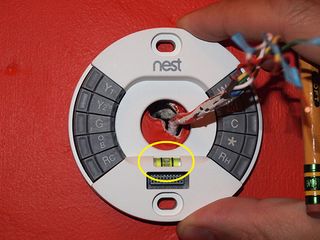
Thread the wires through the center of the Nest base plate and, using the tiny bubble level, make sure the Nest is level. Use a pencil to mark the two screw holes.
5. Install the trim plate (optional).
If you want to cover over the screw holes from the old thermostat, attach the trim plate in the bottom of the Nest box to the base plate.
6. Attach the Nest base to the wall.
Use the included screws and screwdriver to secure the base to the wall. Screw in the top screw first, but before tightening it, use the level to make sure the base is even.
7. Connect the wires to the Nest.

Insert the labeled wires into the corresponding ports on the Nest. A small tab will depress once the wire has been properly inserted.
8. Attach the Nest display.

Line up the small rectangular connector on the back of the display with the port on the base plate.
9. Turn the power back on.
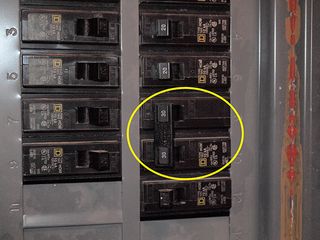
Switch the circuit breaker to the On position.
10. Connect the Nest to your Wi-Fi network.
Follow the instructions on the Nest's display to find your wireless network and enter the password to connect.
11. Follow on-screen setup instructions.
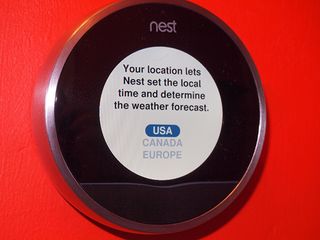
These additional steps will make sure that the Nest’s firmware is up to date, you connected the wires properly, and lets the Nest know the type of power used for your heating system, and where in your house the Nest is located.
11. Set the temperature.

Turn the Nest to set your desired temperature for when you're home and away.
12. Download the Nest mobile app.
This smartphone app, available for Android and iOS devices, will let you monitor and control the Nest remotely.
After a week or so, the Nest will learn your behavior - when you're home and when you're not--and should automatically adjust the temperature in your home. However, you can still turn it on and off remotely using a smartphone, or locally by turning the Nest's dial.
13. Connect Your Nest to Other Smart Home Devices
The Nest will work with a wide range of smart home products and systems, from smart hubs such as the Wink and Samsung SmartThings, to the Logitech Harmony remote control, to Amazon Alexa and Google Home, even to smart locks. Here's a link to all of the Nest-compatible devices and services.
Subscribe to:
Comments
(
Atom
)
-
ChomChom Roller Dog Hair Remover, Cat Hair Remover, Pet Hair Remover Revlon One-Step Hair Dryer & Volumizer Hot Air Brush, Black ...
-
10 Remedies And 8 Exercises To Get Rid Of A Double Chin Healifty V Face Band V Line Bandage Breathable Face Lift Belt Anti Wrinkle Ch...


How to moisturize vagina
How to moisturize vagina Vaginal Dryness: Causes and Moisturizing Treatments IN THIS ARTICLE Causes Diagnosis Medication Oth...